
Replacement Part List


OPERATION
IMPORANT: DO NOT PULL THE UNIT BACKWARDS THROUGH THE SNOW. Snow will go into the air vents found on
the back of the machine and damage the unit.
PLOWING THE SNOW
WARNING! Keep the area of operation free of foreign objects that can become thrown by the auger blades.
Perform a thorough inspection of the area before plowing since some objects may be hidden from view by
surrounding snow. If the snow thrower hits an obstruction or picks up a foreign object during use, stop the snow
thrower immediately. Disconnect the extension cord, remove the obstruction, and inspect the unit for damage.
Repair or replace any damaged parts before restarting and operating the unit.
Keep children, pets, and bystanders away from the area of operation. Be aware that the normal noise a running snow
thrower produces may make it difficult for you to hear approaching people.
Start your clearing path near the electrical outlet and work outward. To clear in the opposite direction, step over the
cord and pivot the Snow Thrower on its wheels. Make sure to overlap clearing paths.
Also keep in mind the wind direction. If possible, move in the same direction as the wind so that the snow is not
thrown against the wind, back into your face or onto the recently cleared path.
While moving the snow thrower, only move within a range the cable can reach.
DO NOT USE YOUR HANDS TO UNCLOG CHUTE. Stop the motor and unplug the unit before removing debris. Do
not walk in front of a running snow thrower. Do not direct the discharged snow towards bystanders. Do not push
the snow thrower with excessive force. Push the snow thrower gently and evenly in accordance with the unit’s throw
rate.
Only use your Snow Thrower with the intention of moving snow. Other materials may hurt the machine and endan-
ger users and bystanders.
Some parts of the snow thrower may freeze under extreme temperature conditions. Do not attempt to operate the
unit with frozen parts. If the parts freeze while the snow thrower is in use, stop the snow thrower, unplug the exten-
sion cord, and inspect it for frozen parts. Make sure all parts have thawed out before attempting to operate the unit
again. Never force parts or controls that have frozen and never use an open flame of any sort to thaw frozen parts.
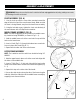
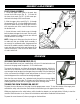
CHANGING THE DIRECTION OF THE SNOW CHUTE
Never direct the snow discharge chute at the operator, bystanders, vehicles or nearby windows. The discharged
snow along with possible foreign objects can cause serious injury and bodily damage if picked up and thrown at a
person or animal. Always point the discharge chute in the opposite direction of anything you don’t want to hit with
snow and foreign objects.
The discharge chute can be adjusted a full 180° degrees by rotating the chute crank. Rotate the chute control crank
clockwise to move the discharge chute to the left and counter clockwise to move it to the right.
The chute deflector on top of the snow chute can be adjusted by squeezing on the height adjustment handle. This
allows users to adjust the angle of the snow stream. Make sure the chute deflector is locked into a position before
operation.
10