SNOW W THROW WER IDEN NTIFICAT TION For inforrmation and questions, please contacct Customer Service by calling c 1-8000-232-1195. Certain innformation will w be requeested by a Customer Serrvice Representative. Pleease fill out the informatiion below an nd have it acccessible prioor to calling. Refer to name n plate on o your Snow w Thrower for the Seriaal Number. Record your Snow Throw wer's informatiion below.
TABLE E OF CON NTENTS Specificaations ……… ……………… ………………………… ……………. Importannt Safety Insttructions ……………… ……………… ……………. Know Yoour Snow Th hrower’s Coomponents ……………… … …………… Assemblyy Instruction ns ………… ……………… ……………… …………… U Unpacking ……………… … ……………… ……………………….. M Middle Framee Assembly …………… ……………… …………… U Upper Frame Assembly …………… … …………….. …………… D Discharge Ch hute Assembbly ………… ……………… …………….. L Lower and Up pper Chute Crank C Assem mbly ……… …………….. Operationn ……………………… ……………… ……………… ……………..
IMPOR RTANT SA AFETY IN NSTRUCT TIONS Warning g: Do not plu ug in the Sn now Throweer until the following stteps have beeen read and d understood d. READ ALL A INSTR RUCTIONS BEFORE USING U YOU UR SNOW THROWER Electricaal Instructio ons Your Snoow Thrower has a polariized male pluug, with onee prong in the switch-houusing sockett slightlyloonger and wiider than thee other. The extension coord female ennd also shouuld be polarized, so that thheextension cord c fits snuugly into the switch-houssing socket.
Personall Safety Stay alerrt, watch whaat you are dooing and usee common seense when operating youur Snow Thrrower. Do not use your Snow w Thrower while w you arre tired or unnder the influuence of druugs, alcohol, ormedicaation. A mom ment of inatttention whilee operating the t Snow Thhrower may result r in seriousboodily injury. NEVER LEAVE YO OUR RUNNIING SNOW W THROWER R UNATTE ENDED. Turrn the power ot leave yourr Snow Throower until it has h come to a complete stop. switch tooOFF.
Abnorm mal operation n - If you nootice the snow w thrower ruunning in ann unstable staate or hear abnormallsounds from m the motor, stop the maachine, discoonnect the poower immeddiately, and contact our o customerr service deppartment. Noise control - Wheen using the snow s throweer, you mustt respect locaal laws and regulationsregarding noise controol and enviroonmental prootection.
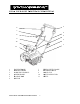
KNOW W YOUR SNOW S TH HROWER R’S COMP PONTENT TS 5 6 7 4 8 3 9 2 10 1 11 1 2 3 4 5 6 LOWER FRA L AME M MIDDLE FR RAME C CARRYING HANDLE U UPPER FRA AME H HANDLE BA AR S SWITCH #5662 SNOW THROWEER OPERATOR R’S MANUAL 7 8 9 10 11 7 UP PPER CHUT TE CRANK PO OLARIZED PLUG P CA ABLE CLIP CH HUTE DEFL LECTOR CH HUTE
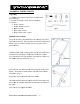
ASSEM MBLY INS STRUCTIIONS Unpackiing 1. Carefuully remove your y Snow Thrower T andd all other items froom box. 2. Your Snow S Throw wer comes with the follow wing accessoriies. • T-bolt: T 4 piecces • Saddle Washeer: 4 pieces • Knob: K 4 piecees • Cable C Clip: 3 pieces • Upper U Chute Crank: 1 pieece Middle Frame F Asseembly For easieer assembly, the handle frames f are marked m with yellow y tape from m the factory y.
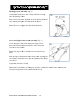
Upper Frame Assem mbly f are marked m with yellow y For easieer assembly, the handle frames tape from m the factory y. This tape indicates thee LEFT sidee of each handles part, as viewed from m the operattor’s positionn of the Snow Thhrower. Hold the upper framee with the yeellow tape onn the LEFT side so that the screw s holes align a with thhe holes on thhe middle frrame. (Fig. 3) Insert a T-bolt T into eaach hole witth the head on o the inside of the handle.
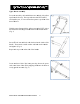
Dischargge Chute Asssembly (Figg. 6) c deflecttor so that it snaps and loocks securelyy Lift the chute onto the discharge ch hute. Raise or lower the ch hute deflectoor to the desiired height of o the snow streeam and tigh hten the chutte deflector knobs. k Note: Doo not over tig ghten the chuute deflectorr knobs. Lower and Upper Chute C Crank k Assemblyy (Fig. 7) Locate thhe upper chu ute crank in the t parts bagg.
OPERA ATION KEEP CH HILDREN AND A BYSTA ANDERS AT A SAFE DISTANCE E while operaating your Snnow Thrower.. he Snow Thhrower, pleasse make suree the power source you will use is inn Note: Beefore using th accordanncewith the specification s ns shown in this t manual. Securingg the Extenssion Cord For safe and efficientt use of yourr Snow Throower, use only a UL-rateed or CSA exxtension cord recommeendedfor outtdoor use (seee page 4).
Powerin ng On and Off To power on, first prress and holdd the switch button foundd alongsidee the switch housing. Pull the handle h bar to oward you annd grasp holld ofit firmlyy with both handds to start th he machine. Themachine T e can only bee started by pressiing the switcchbutton befo fore squeezinng the handlee bar. When thee motor is on n, release thee switch buttton, and keeep hold the handlle bar. Note:Revverse operattion cannot start the machine.
PLOW WING THE E SNOW WARNING G: Keep the area of operration free off foreign objects that cann become thrrown bythe rotor blades. b Perfo form a thorouugh inspectioon of the areea since som me objects maay behidden fro om view by surroundingg snow. If the Snow Throower hits an obstruction or picks upaa foreign objject during use, u stop the Snow Throw wer, disconnnect the extension cord, removethhe obstructio on, and inspeect the unit for f damage.
CHANG GING SN NOW DISC CHARGE CHUTE’S DIRECT TION 1. Neveer direct the snow s dischaarge chute at the operatorr, bystanderss, vehicles or nearby windows.The disscharged snoow and foreiggn objects acccidentally picked p up byy the Snow Throw wer can causseserious daamage and boodily injury. Always poiint the dischaarge chute inn the opposite direction n of anythingg you don’t want to hit with w snow annd foreign objects. 2. The discharge d ch hute can be adjusted a 180ºº by rotatingg the chute crrank.
MAINT TENANCE E WARNIN NG: Make suure to turn offf the switch and disconnnect the extension cord beforeperfo forming any maintenancee task on youur Snow Thrrower. Snow Th hrower Use and Care 1. KNO OW YOUR LIMITATIO L ONS. Do not overload yoour Snow Thrower’s capaacity by attem mpting to cleaarsnow at tooo fast of a raate. 2. Use of o the Snow Thrower forr operations outside of inntended usagges could ressult in a dangeerous situation. 3.
EXPLO ODED VIE EW #5662 SNOW THROWEER OPERATOR R’S MANUAL 16
PARTS S LIST Part# 1 2 3 4 5 6 7 8 9 10 11 12 13 14 15 16 17 18 19 20 21 22 23 24 25 26 27 28 29 30 31 32 33 34 35 36 37 38 39 40 41 42 43 44 45 Stock# 56663-001 56663-002 56663-003 56663-004 56663-005 56663-006 56663-007 56663-008 56663-009 56663-010 56663-011 56663-012 56663-013 56663-014 56663-015 56663-016 56663-017 56663-018 56663-019 56663-020 56663-021 56663-022 56663-023 56663-024 56663-025 56663-026 56663-027 56663-028 56663-029 56663-030 56663-031 56663-032 56663-033 56663-034 56663-035 56663-036
Part# 91 92 93 94 95 96 97 98 99 100 101 102 103 104 105 106 107 108 109 110 111 112 113 114 115 116 117 118 Stock# 56663-091 56663-092 56663-093 56663-094 56663-095 56663-096 56663-097 56663-098 56663-099 56663-100 56663-101 56663-102 56663-103 56663-104 56663-105 56663-106 56663-107 56663-108 56663-109 56663-110 56663-111 56663-112 56663-113 56663-114 56663-115 56663-116 56663-117 56663-118 Description Eye Bolt Rubber Ring Upper Chute Crank Snap Ring 8 Handle Grip Upper Framee Saddle Washher Middle Fram
ONE (11) YEAR LIMITED L D WARRA ANTY SNOW BL LASTER™ is committed c to building b tools that t are dependdable for years.. Our warrantiees are consistenntwith our commiitment and ded dication to quallity. ONE (1) YEAR Y LIMITE ED WARRANT TY OF SNOW W BLASTER™ ™ PRODUCTS FOR HOME USE.