
Use and Care Manual


88
ASSEMBLY
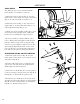
TOOL RESTS
Two different tool rests are included with this
bench grinder. To install these tool rests:
1. Attach the tool rest support (Fig. A - 1) to the
inside surface of the wheel cover using a flat washer
(Fig. A - 2) and a hex head screw (Fig. A - 3).
2. Attach the tool rest (Fig. A - 4) to the tool rest
support (Fig A - 1) using a flat washer (Fig. A - 5)
and an adjustment knob (Fig. A - 6).
3. Adjust each tool rest until its inside edge is 1/16
of an inch from the grinding wheel. Tighten the
hex head screws holding the supports in place.
4. If you are wanting to sharpen drill bits, there
is also a drill bit sharpening plate included in this
package. Attach it to the tool rest support in the
same way as you would the regular tool rests. The
divot running diagonally down the center of the
tool rests allows for easy sharpening of the tips of
bits. Only use this plate for sharpening drill bits.
SPARK ARRESTORS AND EYE SHIELDS
1. Attach the spark arrestors (Fig. B - 1) to the
inside surface of the wheel covers using two screws
and washers (Fig. B - 2).
2. Position said spark arrestors so that the lower
edge is 1/16 of an inch from the grinding wheel.
Firmly tighten the hex head screws.
3. Attach the eye shields (Fig. B - 3) to the spark ar-
restor by inserting a carriage head screw (Fig. B - 4)
through the eye shield and the spark arrestor.
4. Position the eye shield into its desired position.
Assemble the flat washer (Fig. B - 5) and lock knob
(Fig. B - 6) to the carriage head screw and tighten
until the eye shield no longer moves.
1
2
3
Fig. A
4
5
6
Fig. B
1
2
3
4
5
6