
Use and Care Manual


88
ASSEMBLY
WARNING: Unplug the machine from the power source before assembling or making
adjustments. Failure to comply may cause serious injury. Assembly requires at least two
people to safely move around the band saw.
HOW TO ASSEMBLE
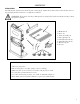
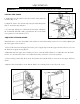
1. Attach the four feet to the base of the band saw (Fig. A).
2. Remove the D-nut (Fig. B - 1), washers (Fig. B - 2) and wing screw (Fig.
B - 3) from the saw’s table assembly (Fig. B).
3. Slide the saw table onto the band saw (Fig. C), making sure that the
blade stays within the slot. Pull the angle adjustment knob back(Fig. D -
2) and align the teeth on the saw blade’s table bracket into the teeth on
the angle adjustment knob. Release the knob.
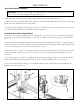
4. Fit the pins on the frame into the slots of the table bracket (Fig. D - 3).
5. Assemble the flat washer and table lock handle (Fig. D - 1). Tighten
the table assembly to the saw’s frame by turning the table lock lever clock-
wise.
6. Fix the band saw to a workbench by using the four screws (not provid-
ed, Fig. E - 3) through the holes in the base of the band saw (Fig. E).
7. Place the fence (Fig. E - 1) and the miter gauge onto the table (Fig. E -
2).
Fig. A
Fig. B
Fig. C
Fig. D
Fig. E
1
2
3
1
2
1
2
3
3