
Product Manual


OPERATION
15
(CONTINUED FROM LAST PAGE)
To know the proper RPM will take some experience. Harder metals should use a slower RPM while softer can
use a little faster RPM. If you are unsure, it is better to go slower than risk damage to the work, the cutting tool
or the lathe by using too high of an RPM. Feed rate and DOC are also very important. A deeper DOC needs a
slower feed rate and slower RPM, and vice versa.
Once you are ready to begin, switch the machine ON and set the RPM to your desired level. Slowly feed the cut-
ting tool into the work piece using the carriage handle. Slowly feed the cutting tool across the work piece until you
reach the marked end point. Retract the cross slide and cutting tool at this point one or two full revolutions. Re-
turn the carriage to the starting point, and then feed the tool back in the same number of revolutions plus a small
additional feed rate in. Repeat this process until you have the desired amount of material cut away.
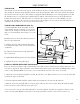
USING AUTOMATIC FEED
Once you have the cross slide set in position double check the following:
1. The Auto Feed Direction Lever is set to FORWARD.
2. The auto feed lever is disengaged from the lead screw.
3. You are in the appropriate speed selection range of HIGH/LOW.
4. The gear train is in the proper configuration, as this determines the feed rate of the lead screw. The factory set-
ting is okay for normal turning, but if you have been cutting screw threads you will need to reset the gear train to
the proper configuration.
TO PERFORM THE CUT WITH THE AUTOMATIC FEED
Note: Ensure the DOC is appropriate for the cutting tool material, workpiece material, etc.
1. Position the cutting tool past the end of the work piece away from the tail stock. Make sure the tool is set to the
proper cutting depth. Always do shallow cuts, as cutting too deep too fast will damage the work piece, your cutting
tool, and your lathe. It is recommended to keep the cuts to 0.010” (0.25mm) or less at a time.
2. Double check that all the feed levers are in the proper direction.
3. Turn the unit on, set the spindle speed to the desired rate. Push the autofeed lever down to engage the half nut
with the lead screw.
4. Watch your cutting tool. When it reaches the end, quickly press UP on the auto feed lever and make sure it
stays disengaged from the lead screw.
5. Retract the cutting tool one or two turns using the cross slide handle. Feed the carriage back to the starting
point, and feed the tool back in one or two turns plus the additional cutting depth.
6. When ready for the next pass, engage the auto feed lever and repeat the previous steps until you have removed
the desired amount of material.
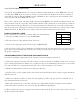
FACTORY SETTINGS
A 20
B 80
C 20
D 80