
Product Manual


OPERATION
14
CREATING NORMAL TURNING
Before starting a turning, always plan your work ahead of time. Create a drawing or plan with all of the dimensions
you desire for the workpiece. Make sure to have all the measuring tools you will need to double and triple check
your cuts. Ensure that the feed rate, depth of cut (DOC), and spindle speed (RPM; depends on material, cutting
tool material and profile, DOC, desired surface finish, workpiece geometry, etc.) are all proper for your opera-
tion. To avoid stalling the motor, we recommend that the DOC never exceed 0.5mm (0.0196 in), and should be
kept below 0.25mm (about 0.01 in) whenever possible. Reduce spindle speed when taking a deeper cut.
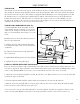
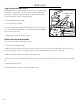
Place the work into the chuck or attach to the faceplate. If necessary, use the tailstock center to support the oppo-
site end. If the tailstock is not needed, it can be removed completely by loosening the nut and sliding the tailstock
off the bed.
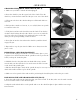
After you have the work planned out, select the necessary cutting tools for the feature you wish to create and
mount them to the tool post. Make sure the tool tips are aligned with the center line of the workpiece, or slightly
below them (double check the tool mounting procedure in the “Tool Post” section on page 12).
Mark the end point for the cut on the work piece using a scriber. Line up the cutting tool with the end point and
feed in the cross slide until it just touches the surface of the workpiece. Then turn the spindle by hand to make
sure there is no interference between the carriage, cross slide, tool post, cutting tool, or chuck. It may be necessary
to adjust the compound slide or the workpiece in the chuck to get the proper amount of clearance.
When you have assured there is adequate clearance, back the cross slide away from the work piece and move the
carriage away from the head stock. Next zero out the cross-slide:
1. Feed the cross slide and the cutting tool to the starting position of the cut.
2. Back the cross slide 0.015” away from the work piece.
3. Slowly feed the cross slide back to the starting point.
4. Hold the handle to move the cross slide in place with one hand, and turn the dial of the gauge to make the 0
and the 0.000 marks line up. The cross slide and cutting tool are now zeroed out.
5. If you have to back feed the cross slide at all repeat steps 1 through 4.
NOTE: Before each pass of the cutting tool, it is recommended to add oil to the work piece to reduce heat and
friction. Make sure to periodically add oil to the work piece as needed while turning.
USING MANUAL FEEDING
Double check the following before you begin turning:
1. The auto-feed lever is in the UP position, so the carriage half nuts are disengaged from the lead screw.
2. The Auto Feed Direction Lever is in NEUTRAL.
3. You are in the appropriate speed selection of HIGH/LOW for the material you are turning.
(CONTINUED ON NEXT PAGE)