
Product Manual


11
ADJUSTMENTS
TAILSTOCK
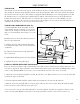
The tailstock is located on the bed opposite of the headstock. It can be moved along the bed by loosening the 17
mm nut (Fig. E - Item E) and pushing the tailstock to the desired position. When it is in the desired spot, tighten
the 17 mm nut to lock it in place. The tailstock is equipped with an MT2 taper to use with appropriate tools, like
the included center, or a properly tapered drill chuck or drill bit. The tailstock arrives properly aligned to the
headstock from the factory. This allows the use of dead or live centers, as well as on center drilling to be per-
formed on the workpiece. If you need to create a taper to the workpiece it is necessary to offset the tailstock (see
“Offsetting Your Tailstock” section on page 12 for more info).
E
F
A
B
C
D
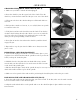
TAILSTOCK COMPONENTS (FIG. E):
A. Tailstock Handle: Feeds the quill in and out
of the tailstock into the workpiece. Use to push a
center into the workpiece to hold it level horizon-
tally, or to feed a drill into the workpiece to create
a hole.
B. Offset Setscrew: Locks the tailstock position to
allow for offset alignment
C. Offset Cap Screw: Allows tailstock alignment
to be adjusted to right or left of center (underside
of tailstock)
D. Tailstock Lock Nut: Secures the tailstock in
place on the bed
E. Quill: Holds MT2 tapered tools in the tailstock
F. Quill Lock: Secures the quill in place
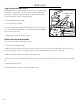
USING A CENTER WITH THE TAILSTOCK
If you are turning a workpiece with stock that hangs more than 2.5 times its diameter beyond the chuck jaws, it is
necessary to support the other end with a center and the tailstock. For projects that allow low RPM turning, a dead
center is okay. If higher RPMs are necessary, it is recommended to invest in a live center. To install:
1. Check the center and tailstock quill for any dirt, dust, debris or oil. Wipe both down, as excessive oil or dirt will
not allow the tapers to interlock.
2. Turn the tailstock handle until the quill protrudes approximately 1/2” inch from the tailstock.
3. Slide the center into the quill until it is snug, the tapers will keep the center in place. Keep the quill extended
between 0 and 1.5 on the quill scale to keep it secure.
4. To remove the center use the tailstock handle to retract the quill into the tailstock completely. This forces the
center out of the quill. Hold the head of the center with your hand to catch it as the center becomes loose.
Fig. E