
Use and Care Manual
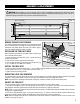


OPERATION
19
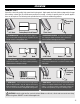
SPINDLE TURNING - SANDING THE WORKPIECE
Adjust the lathe to a slower speed for sanding and finishing. High speed can build friction while sanding and cause
burns in some woods. The cleaner the cuts, the less sanding will be required. So try to make the cuts as refined as
you can before moving to the sanding process.
1. Use sandpaper finer than 120 grit, as coarse sandpaper may scratch the workpiece. Fold the sandpaper into a
pad will allow easier and safer sanding. Do not wrap the sandpaper around your fingers or the workpiece.
2. Apply light pressure to the workpiece during sanding. Use power-sanding techniques to avoid concentric sand-
ing marks around your finished piece.
3. Progress through finer grits of sandpaper until the desired surface is achieved. Finish sanding with 220 grit
sandpaper.
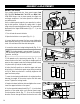
SPINDLE TURNING - FINISHING THE WORKPIECE
1. Turn off the lathe. The workpiece can be left on the lathe when applying finish.
2. Remove the sanding dust with tack cloth or compressed air.
3. Apply the finish using a brush or paper towel. Let the finish stand for several minutes and remove any excess
finish before restarting the lathe.
4. Start the lathe at the lowest speed, as high speed may cause the fresh coat to splash. Allow the finish to dry and
sand the workpiece with 320 to 400 grit sandpaper.
5. Apply a second coat of finish and buff the workpiece.
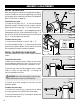
MOUNT THE WORKPIECE ONTO THE FACE PLATE
When turning bowls or plates with a large diameter, mounting it to the face plate to gives the maximum amount
of support. While face plates are the most reliable method for holding a larger block of wood for turning, a lathe
chucks can also be used. A chuck is handy when working on more than one piece at a time, allowing your to open
the chuck and change workpieces instead of having to remove the mounting screws.
1. Select a stock that is at least 0.2 inches (5 mm) larger than each dimension of the finished workpiece.
2. Remove any bark from the top of the wood stock (that will be later attached onto a face plate or in a chuck).
3. True one of the surfaces of the workpiece for mounting against the face plate. Using the face plate as a template,
mark the location of the mounting holes on the workpiece and drill pilot holes of the appropriate size.