
Use and Care Manual


The following operation instructions serves as a beginning point for some common lathe operations. Practice
on scrap material to become familiarized with the operation process and make the necessary adjustments before
working on your workpiece.
ROUGHING OUT CUT
Roughing out is the first step of the lathe operation, which uses the large roughing gouge tool to smooth out sharp
corners to make the workpiece cylindrical. When roughing out a workpiece, run the lathe at low speed and always
cut downhill, from the large diameter side of the workpiece to the small diameter side.
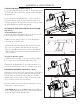
1. Make sure the lathe turned off and disconnected. The first cut will start about 2 inches from the tailstock end of
the workpiece. Adjust the tool rest to the suitable position and set the lathe to a slow speed.
2. Plug in and turn on the lathe. Wait for the motor to reach full speed. Place the roughing gouge on the tool rest
OPERATION - SPINDLE TURNING
about 2 inches from the tailstock end of the workpiece. Slowly and gently raise the tool handle until the cutting
edge comes into contact with the workpiece.
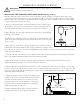
NOTE: Make sure that the tool is being held well on the work, with the bevel or grind tangent to the revolving
surface or the workpiece. This position will generate a clean shearing cut. Do not push the tool straight into the
work.
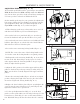
3. To make the first pass, rolling the flute of the tool (the hollowed-out portion) towards the end of the tailstock.
4. Make the second pass, starting at about 2 or 3 inches to the left of the first cut. Again, advance the tool towards
the tailstock, and merge with the previous cut.
5. As your cuts get close to the headstock live center end of the workpiece, roll the gouge in the opposite direction
to carry the final cut off the live center end of the workpiece.
NOTE: Always work towards the end of the workpiece; NEVER start a cut at the end.
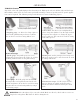
6. Make long sweeping cuts in a continuous motion to turn the workpiece to a cylinder. Keep as much of the
bevel of the tool in contact with the workpiece as possible to ensure control and avoid catches. The roughing cut is
continued until the work approaches about 1/8 inch to the required cylinder diameter.
7. Once the workpiece is roughed down to a cylinder, smooth it with a large skew chisel tool. The turning speed
can be increased. Keep the skew handle perpendicular to the spindle and use only the center third of the cutting
edge for a long smoothing cut (touching one of the points of the skew to the spinning workpiece may cause a catch
and ruin the workpiece).
8. See pages 16 and 17 for adding details and finishing the workpiece.
NOTE: Constantly remember to move the tool rest inward towards the workpiece to keep a safe distance be-
tween the tool and your workpiece.
15