
Use and Care Manual

10
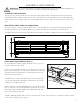
ASSEMBLY & ADJUSTMENTS
SETTING UP THE HEADSTOCK SPUR CENTER
(Fig. 5 & 6)
Install the headstock spur center to turn workpiece between
1
1
2
2
SETTING UP THE FACE PLATE (Fig. 3 & 4)
NOTE: When installing the face plate for turning bowls and plates, mount the workpiece onto the face plate
prior to installing the face plate on the headstock (see page 18).
A A
B B
C C
D D
E E
F F
8
8
7
7
6
6
5
5
4
4
3
3
2
2
1
1
DRAWN
CHK'D
APPV'D
MFG
Q.A
UNLESS OTHERWISE SPECIFIED:
DIMENSIONS ARE IN MILLIMETERS
SURFACE FINISH:
TOLERANCES:
LINEAR:
ANGULAR:
FINISH:
DEBURR AND
BREAK SHARP
EDGES
NAME
SIGNATURE
DATE
MATERIAL:
DO NOT SCALE DRAWING
REVISION
TITLE:
DWG NO.
SCALE:1:10
SHEET 1 OF 1
A3
WEIGHT:
34034.solidworks
1
45
2
3
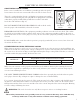
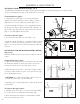
Spindle Lock
Disengaged Locked
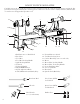
To install the face plate:
1. Thread the face plate (Fig. 3 - 1) onto the headstock
spindle by turning it clockwise as far as it will go, and then
tighten the two set screws with a hex wrench (Fig. 3 - 2).
2. Lock the spindle lock (Fig. 3 - 3) by engaging the knob in
the deep groove (Fig. 4). Insert the knockout rod (Fig. 3 - 4)
into a hole on the side of the face plate and use the wrench
(Fig. 3 - 5) to fully tighten the face plate.
To remove the face plate:
1. Loosen the two face plate set screws (Fig. 3 - 2).
2. Lock the spindle lock (Fig. 3 - 3) and insert the knock out
rod (Fig. 3 - 4) into the face plate side hole. Use the wrench
(Fig. 3 - 5) to unscrew the face plate by turning it towards the
operator.
Fig. 3
Fig. 4
Fig. 6
Fig. 5
centers.
To install the spur center:
1. Make sure the mating surfaces of both the spur center and
the headstock spindle are clean. You can use an acetone-
moistened cloth to remove any other debris, oil, etc.
2. Drive the spur center (Fig. 5 - 1) into the workpiece (Fig. 5
- 2) using a rubber mallet or a piece of scrap wood (see page
14 for detailed instructions).
CAUTION: Never drive the workpiece into the spur cen-
ter while the spur center is in the headstock.
3. Push the spur center through the face plate into the head-
stock spindle.
To remove the spur center:
1. Hold the spur center (Fig. 6 - 1) to prevent it from falling.
Use a rag to protect your hand from the sharp edges.
2. Insert the knockout rod (Fig. 6 - 2) through the spindle
hole to tap out the spur center.
1