
Use and Care Manual


9
ASSEMBLY & ADJUSTMENTS
INSTALLING THE WHEELS
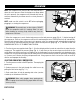
1. Insert the bolt (Fig. 2 - 1) into the wheel (Fig. 2 - 2), through the wheel bracket (Fig. 2 - 3), through the flat washer
(Fig. 2 - 4), and install the nut (Fig. 2 - 5). Tighten the nut.
INSTALLING THE AIR FILTER
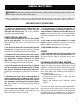
1. Remove the plastic plug as instructed on the yellow hang tag on the unit. Install the air filter (Fig. 3 - 1).
Fig. 3
1
OPERATION
STARTING THE COMPRESSOR
1. Follow all instructions in the assembly guidelines outlined
above before attempting to start the compressor. Do not start
the compressor until the air filter has been properly installed.
2. Inspect the machine components to make sure that there are
no damaged or worn parts. Replace any damaged parts imme-
diately. Only repair using identical replacement parts.
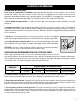
3. Check that the pressure switch (Fig. 4 - 1) is turned to the OFF
position and the tank drain valve (Fig. 4 - 2) is closed.
4. Connect an air hose (not included) to the air line inlet (Fig.
5 - 1). The air hose must be rated to exceed the compressor’s
maximum pressure of 150 PSIG.
5. Connect the electrical plug to a power supply.
NOTE: The compressor must be at least one foot from any wall
or obstruction and in a well-ventilated area in order to maximize
proper air flow. Do not cover the compressor.
6. Turn the pressure switch (Fig. 4 - 1) to the ON/AUTO posi-
tion to allow the compressor to automatically start up and shut
down, depending on its need for air.
Fig. 2
1
2
3
4
5
Fig. 4
1
2
Fig. 5
1