
Manual

Operating Instructions
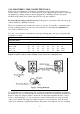
To Start The Compressor:
1. Check to make sure the Air Tank’s Drain Valve, located at the bottom of the Air Tank, is
fully closed.
2. Plug the Power Cord into the nearest 120 volt, grounded, electrical outlet.
3. Push in the “ON” side of the ON/OFF Power Switch to turn the compressor on.
Note: When the maximum air pressure, 100PSI, is reached as indicated by the tank pressure
gauge, the motor will stop. The compressor will automatically restart when the air pressure drops
bellow 85PSI.
To Stop The Compressor:
1. Push the ON/OFF Power Switch to its “OFF” position.
2. Turn air-flow valve to off (handle perpendicular to outlet pipe). Press trigger on tool to
relieve air pressure in hose. Disconnect hose from air-flow valve.
3. Relieve the Air Tank pressure and remove moisture by opening the Tank Drain Valve. Turn
the valve slowly counter-clockwise until the pressure is relieved. Then, retighten the Drain
Valve.
4. Allow the Air Compressor to completely cool. Then store the unit in a clean, dry, safe
location out of reach of children.
Inspection, Maintenance, and Cleaning
1. WARNING! Make sure the ON/OFF Power Switch of the Air Compressor is in its “OFF”
position, the unit is unplugged from its electrical outlet, and air is drained from the Tank
before performing any inspection, maintenance, or cleaning procedures or leaving it
unattended.
2. Before each use, inspect the general condition of the Air Compressor. Check for loose screws,
misalignment or binding of moving parts, cracked or broken parts, damaged electrical wiring,
loose air fittings, and any other condition that may affect the safe operation of the
Compressor. If abnormal noise or vibration occurs, have the problem corrected before further
use. Do not use damaged equipment.
3. Daily, purge the Air Tank of all air and moisture to prevent corrosion. To do so, slowly and
carefully unscrew (no more than four threads) the Tank Drain Valve until the compressed air
and condensation begins to be released from the Tanks. Allow sufficient time for all of the
air and condensation to escape from the Tanks. Then, firmly re-tighten the Drain Valve.
4. CAUTION! All maintenance, service, or repairs not mentioned in this manual must only be
performed by a qualified service technician.
5. To replace the Fuse, unscrew the fuse and replace with a 250V, 3A fuse.
9