
Use and Care Manual
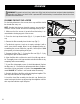


CHARGING THE BATTERY PACK
The 20V battery pack for this tool is supplied in a low charge condition to prevent possible problems, and must be
charged completely before you use the tool for the first time.
1. Connect charger to a 120V, 60Hz AC outlet. The green light on the charger will illuminate, indicating that the
charger is powered.
2. Slide the battery all the way into the charger until it clicks. The red light on the charger will illuminate, indicating
that the battery is charging.
Charging Indication:
• Solid Green: Ready to Charge
• Solid Red: Charging
• Solid Green: Charged
3. When the battery is charged, the red light will turn off and the green light will turn on. Remove the battery from
the charger and unplug the charger from the power supply.
NOTE: Battery will not reach full charge the first time it is charged. Allow several cycles for the battery to fully
charge. The battery pack may become warm while charging; this is normal. If the battery is hot after continuous use
in the tool, allow it to cool to room temperature before charging. This will prolong the life of your battery.
The battery pack is equipped with three LED battery life indication lights. Press and hold the power button on the
rear of the battery to check the battery’s charge status.
Battery Life Indication:
• Three Lights: The battery is fully charged.
• Two Lights: The battery is about 60% charged.
• One Light: The battery is almost out of power and needs to be charged.
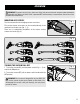
INSERTING AND REMOVING THE BATTERY
1. To install the battery, slide the battery pack into the battery port at the top of the band saw. Make sure the release
latch on the rear side of the battery pack snaps into place and battery is secure before beginning operation.
2. To remove the battery pack, press the battery release latch on the front of the battery and pull the battery pack out.
OPERATION
WARNING! To prevent serious injury, make sure all the instructions have been read and understood before
operating this tool. Make sure that the tool is powered OFF and the battery is removed from the tool for all ad-
justments and maintenance.
13