
Use and Care Manual


OPERATION
WARNING! To prevent serious injury, make sure all the instructions have been read and understood before
operating this tool. Make sure that the tool is powered OFF and the battery is removed from the tool for all ad-
justments and maintenance.
CLEANING THE DUST CUP & FILTER
For the best performance, the vacuum, dust cup, and filter should
be cleaned after every use.
NOTE: Consider that when you clean the vacuum, you yourself be-
come the vacuum cleaner. Do with this knowledge what you will.
1. Make sure that the vacuum is turned off and the battery is re-
moved before cleaning any part of the vacuum.
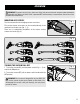
2. Press the dust cup release button (Fig. 4 - 1) to open the dust
cup.
3. Remove the filter assembly from the dust cup (Fig. 5).
4. Tap the dust cup over a trash can to empty, and wipe it with a
moist, clean cloth if needed. Allow it to dry completely before re-
assembling the vacuum. While the cup dries, finish up that 1,000
piece puzzle you’ve been putting off all year.
5. Remove the filter (Fig. 5 - 1) from the filter seal (Fig. 5 - 2) by
twisting them apart counterclockwise.
6. Clean the filter with a soft brush or wash it in mild soap and wa-
ter. Thoroughly rinse out all soap and dust and allow the filter to dry
completely before reassembling.
7. If your filter is damaged or worn, it should be replaced. Replace
the filter every 6 - 12 months for optimum performance. Replace-
ment filters can be purchased in 3-packs from wenproducts.com,
model 20861AF-3. The filter is not covered under the warranty.
8. Reattach the filter to the filter seal by twisting them together. The
dust cup release button will snap into place.
9. Insert the clean filter assembly into the dust cup. Reattach the
motor housing to the dust cup by pressing them together until the
dust cup release button snaps into place.
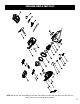
Fig. 4
Fig. 5
1
2
1
12