
Owner`s manual


2. Remove the wing nut from the air filter, and remove the filter.
3. Remove the foam filter from the paper filter.
4. Inspect both air filter elements, and replace them if they are damaged. Always
replace the paper air element at the scheduled interval.
5. Clean the air filter elements if they are to be reused.
Paper air filter element: Tap the filter element several times on a hard surface to
remove dirt, or blow compressed air [not exceeding 30psi] through the filter element
from the inside. Never try to brush off dirt; brushing will force dirt into the fibers.
Foam air filter element: Clean in warm soapy water, rinse, and allow drying
thoroughly. Or clean in nonflammable solvent and allow to dry. Dip the filter element
in clean engine oil, and then squeeze out all excess oil. The engine will smoke when
started if too much oil is left in the foam.
6. Wipe dirt from the inside of the air cleaner base and cover, using a moist rag. Be
careful to prevent dirt from entering the air duct the leads to the carburetor.
7. Place the foam air filter element over the paper element, and reinstall the
assembled air filter. Be sure the gasket is in place beneath the air filter. Tighten
the air filter wing nut securely.
8. Install the air cleaner cover, and tighten the cover wing nut securely.
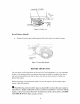
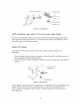
PA_ER
FI_ER
ELEMENT
FOA_
FtETER
ELEMENT
Figure 18- Air Filter Components
Sediment Cup Cleaning
tL WARNING: Gasoline and gas fumes are highly flammable.
• Do not fill tank near an open flame.
• Do not overfill. Always check for fuel spills.
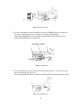
1. Move the fuel valve to the OFF position, and then remove the sediment cup and O-
ring.
2. Wash the sediment cup and O-ring in nonflammable solvent, and dry them
thoroughly.
3. Place the O-ring in the fuel valve, and install the sediment cup. Tighten the sediment
cup securely.
2O