
Service manual


SERVICE MANUAL WG-xxG Series Gas Griddles Installation PAGE 3-1
TESTING GAS PRESSURE
Ports for measuring outlet gas pressure are
located on the end of each valve below the red
terminal block, a port (# 40 Plug) is also available
on the manifold.
To connect a water column gauge, remove the
grease drawer to gain access to the left side
valve, remove the alien head screw plug sealing
the test port, install an adapter fitting in the test
port and connect the hose of the gauge.
The regulator Has an adjustment screw under the
cap at the raised center of the body of the
regulator. Outlet pressure is factory set at the
regulator manufacturer for 5 inches (W.C.) for
Natural Gas and 10 inches (W.C.) for Propane
Gas.
If adjustment is required, remove the cover screw
on the regulator, adjust the inner screw counter-
clockwise to increase the pressure and clockwise
to decrease.
PURGING RAW GAS
Caution must be taken to ensure that no raw gas
is present in the surrounding area before
attempting to place the griddle into operation.
When using LP. Gas, remember that it is
heavier than air. Sniff at floor level for
presence of LP. Gas. If present do not attempt
to start or light plots.
LIGHTING PILOTS
Each burner assembly has a pilot assembly that must
be lighted before the matching main burner can be
operated. To light the pilot, (You need a LONG Match)
set thermostat control knob(s) to the "OFF" position.
Press in and rotate the plastic control knob on the gas
valve to 'PILOT' position, continue to press in on knob,
feed a lighted long match through the rectangular
viewing cut-out adjacent to the pilot assembly.
After the pilot flame has been established the
match can be withdrawn, continue to press in the
knob for approximately 30 seconds, slowly
release the knob.
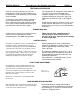
The pilot flame should be set to cover a % to Yi
inch tall section of the thermopile to ensure that
the thermopile will energize the pilot valve and
maintain the pilot flame.
If the pilot flame is set too high or low, see the
“pilot flame adjustment” below.
PILOT FLAME ADJUSTMENT
The adjustment screw for setting pilot flame level is
located under the slotted metal cap just to the left of
the pointer for the control knob on the gas valve.
To increase the flame level, turn the adjustment screw
inside the valve counter-clockwise to decrease the
flame turn it clockwise.
Replace the cover after the correct pilot flame level
has been set.
MAIN BURNER AIR/FUEL MIXTURE
Each main burner has an adjustment collar at the inlet
end of the burner. This collar is locked from turning by
a 5/16" hex head screw that must be
loosened to rotate the mixing collar to add or
subtract the amount of combustion air mixed with
the incoming gas as it enters the main burner to
produce a steady blue flame.
7
3/8"
to
1/2"
flame is desired