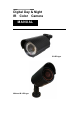
Digital Day & Night IR Color Camera 설명서용 서 MANUAL IR LED type Without IR LED type
The lightning flash with an arrowhead symbol, within an equilateral triangle is intended to alert the user to the presence of un insulated Dangerous voltage within the product's enclosure that may be of sufficient magnitude to constitute a risk of electric shock to persons. The exclamation point within an equilateral triangle is intended to alert the user to the presence of important operating and maintenance (Servicing) instructions in the literature accompanying the appliance.
■ Warning The camera needs periodic inspection. Contact an authorized technician for inspection. Stop using your camera when you find a malfunction. If you use your camera around smoke or unusual heat for a long time, fire may be caused. Do not install the camera on a surface that can not support it. Unless the surface is suitable, it could cause falling or other hazards. Do not hold plug with wet hands. It could cause an electric shock. Do not disassemble the camera.
■ Precautions Only use the camera under conditions where temperatures are between -10°C and +50°C. Be especially careful to provide ventilation when operating under high temperatures. It can cause the image quality to be poor. Severe lighting change or flicker can cause the camera to work improperly. It is one of the most important parts of the camera. Be careful not to be stained by fingerprint. It can cause malfunctions to occur. It can damage the CCD. If it gets wet, wipe it dry immediately.
1. Features ☺Horizontal Resolution 600 TV Lines Clear image quality has been achieved by employing a SONY CCD with 410,000 (Effective) pixels, which provides a horizontal resolution of 600 TV lines. ☺DAY & NIGHT This camera has a function that automatically selects the mode that is appropriate for daytime or night-time conditions. The COLOR mode operates in daytime conditions to provide optimum colors, and BW mode operates in nighttime conditions to enhance the definition of the image.
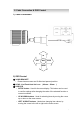
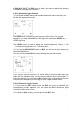
2. Cable Connection & OSD Control 1) Cable Connection UP LEFT SET RIGHT DOWN 2) OSD Control ① 3AXIS BRACKET - Please loosen screws and fix tilted and panned position. ③ LENS : Vari-Focal Auto Iris Lens ( 6.0mm ~ 50mm ) ③ OSD PCB - SETUP button : Used for the menu display. This button can be used to confirm settings after changing the value of the selected function or current conditions. - UP & DOWN buttons : Used for selecting items by moving the cursor up or down on the menu screen.
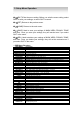
3. Setup Menu Operation □ USING ICONS IN THE MENU ◆ (EXIT) Exits the menu setting. Before you exits the menu setting, select SAVE to save your settings, or select QUIT to cancel. ◆ (RET) Returns to the previous menu ◆ (HOME) Returns to the main menu. ◆ (SAVE) Used to save your settings of MASK AREA, PRIVACY ZONE and more. Once you save your settings, they will remain even if you select QUIT in the menu. ◆ (DEL) Used to deletes your settings of MASK AREA, PRIVACY ZONE and more.
□ MAIN MENU ◆ CAMERA SET Configure Camera related functions and data. ◆ INTELLIGENCE You can configure the settings of motion detection and more. ◆ PRIVACY ZONE You can configure the privacy related settings. ◆ OTHER SET You can configure for Factory Defaults, and more. ◆ COMMUNICATION Configures the settings regarding the UART communication. ◆ SYSTEM INFO. Displays the system information including the camera version and communication settings. ◆ LANGUAGE Select a preferred one from the supported languages.
● IRIS [ALC, ELC] The IRIS menu is used if you want to adjust the intensity of radiation incoming to the camera. ● ALC (Automatic Light Control) ①If you press the SET switch with an ALC based sub menu selected, you will see the appropriate screen. The LENS menu is used if you select a type of the AI lens. For normal operation, you must select DC for a DC-type lens, and select VIDEO for a VIDEO type lens. The LEVEL menu is used to adjust the overall brightness, where “+” will increase the brightness and “.
●AGC[OFF, VERYLOW, LOW, MID, HIGH, VERYHIGH, USER, FIX] The AGC (Auto Gain Control) menu is used to set the AGC level of the camera. When the AGC is active, the camera automatically increases the sensitivity by amplifying the Video signal when the strength of the signal falls below the normal value. If OFF or FIX mode is selected in the SENS-UP menu, you can specify the AGC level. If you press the SET switch with a USER sub menu selected, you will see the appropriate screen.
●SHUTTER [OFF, AUTO1/100(PAL:1/120), AUTO1/250, AUTO1/500, AUTO1/1000, AUTO1/2000, AUTO1/4000, AUTO1/10K, 1/100(PAL:1/120), 1/250,1/500, 1/1000, 1/2000, 1/4000, 1/10K, EXT] The SHUTTER menu is used to set the fixed high-speed electronic shutter, auto high speed electronic shutter and external high speed electronic shutter (EXT). You can select one of 7 options from 1/100(PAL:1/120) to 1/10K for the fixed high speed electronic shutter, which is mostly used for imaging a fast moving object.
※ Note : -If you set DIS to ON, the compensation area will be enlarged as set in the digital zoom factor. -If you set the digital zoom factor to greater than the enlarged zoom factor for the compensation, the DIS function will be deactivated. ● DAY/NIGHT[DAY, NIGHT, AUTO, EXT] ◇ DAY If set to DAY, it will be fixed to DAY mode regardless of the ambient conditions. ◇NIGHT If set to NIGHT, it will be fixed to Black-and-White mode regardless of the ambient conditions.
You can specify Mask 1 and 2 simultaneously. The mask is used only for determining the filter switch and any excessive bright area at night will be masked. ※Note: -If BACKLIGHT is set to BLC, the MASK AREA function will be deactivated. ◇ EXT This enables an auto switch between DAY and NIGHT modes using the interface with the external sensor. (For IR LED models, inside CDS sensor will control IR LED ON/OFF.) ● WHITE BAL [DAY/NIGHT] If you want to adjust the color scheme, use the WHITE BALANCE function.
◇ AWC (Auto White Balance Control):If you press the SET switch in the appropriate item position, Auto White Balance will perform once. ◇ 3200K : Set color temperature to 3200K ◇ 5600K : Set color temperature to 5600K RED : Adjusts the strength of the red color. BLUE : Adjusts the strength of the blue color. R-GAIN/B-GAIN: Enables you to set the current color temperature manually. BRIGHTNESS: Select a brightness level in switching from setting in DAY mode to setting in NIGHT mode.
● PIP [OFF, ON] Displays a sub image together with the main image on the same screen using the Picture in Picture function. ※Note: -If more than one privacy zone is set and the PRIVACY SET is set to ON, the PIP function will be deactivated. 2). INTELLIGENCE You can set the motion detection and tracking in the INTELLIGENCE menu. ● MOTION [OFF, TRACKING, DETECTION] ◇ TRACKING Detects and tracks a moving object. ◇ DETECTION Detects a moving object. ● MASK AREA [1~4] Specify a detection exception area to mask.
3) PRIVACY ZONE SETUP The PRIVACY function will protect your privacy by screening the privacy area that you have specified during monitoring. You can specify up to 12 privacy zones. If you set the PRIVACY SET to ON, your PRIVACY ZONE settings will be applied. You can change the style to adjust the mosaic size and color of the PRIVACY ZONE. Use the ▲▼◀▶switch to select one from PRIVACY 1 through 8. Select one from PRIVACY1~12 and press the SET switch to confirm your setting.
4) OTHER SET ● FACTORY DEFAULTS All the settings will be restored to the factory default. However, the settings of PROTOCOL, BAUDRATE, ADDRESS and LANGUAGE will not be restored to the default. ● OSD COLOR [BW, R/G/B] You can set the OSD (On-screen Display) color to COLOR or B/W. 5) COMMUNICATION The COMMUNICATION menu is used to configure the settings regarding UART communications. Use the connector of the camera to connect to UART Use the ▲▼◀▶switch to specify the protocol and baud rate for communications.
5. Troubleshooting If there are problems in operation, please refer to the items below. If the problem persists, please contact the agent you purchased this product from. Problems Nothing appears on the screen. The video image is not clear. The screen is dark. There is a problem with the camera operation. The MOTION DETECTION function is not working. Colors are not quite right. The screen is flickering. COLOR mode is not working. SENS-UP function is not Working.
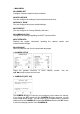
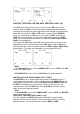
6. Protocol Setting Manual How to set the protocol 1. Turn off the power 2. Set the Rotary Hexa Switch (0~F) to ‘0’. The Rotary Hexa Switch is located in bottom side of the below picture. 3. Supply the power and then wait for around 3 sec -> It will be entered to Protocol setting mode. 4. Turn the Rotary Hexa Switch (0~F) to any one of 1~6. 1: PELCO-D 2400BPS 2: PELCO-D 4800BPS 3: PELCO-D 9600BPS 4: D-MAX 2400BPS 5: D-MAX 4800BPS 6: D-MAX 9600BPS 5.
How to set the Camera ID 1. Turn off the power of Camera. 2. Select one value among 1~E for the Rotary Hexa switch in bottom side of the picture. ☞ Caution ☜ 0: not allowed to be set - It is using for protocol setting ID. Not allowed to be set for Camera ID F : Not allowed to be set – It is using for Lock ID of automatic zoom/focus. Not allowed to be set for Camera ID 3. Turn off the power of Camera 4. Turn on the power again. 5. Start to communicate with the changed ID.
How to operate the Camera by Networking 1. Control the camera by the connected Keyboard after setting of Baudrate and Protocol ID. In case using PELCO-D protocol, the calling key is Preset 30. Use Preset key as menu key because there is no menu key in PELCO-D. But D-MAX supplies a menu key. - The lightness of LED can be controlled in both PELCO-D and D-MAX protocol. Preset 1 is for the increasing of the lightness, Preset 2 is for the decreasing of the lightness.
7. Specifications Sub-items CCD Device Total Pixel Effective Pixel Inter. H/V Sync LL H/V Sync Horizontal Resolution Minimum illumination (F1.2) S/N Ratio OSD Privacy Zone Day & Night Motion Detection D-Zoom High Speed Shutter Flickerless Sens Up (Low Shutter) BLC AGC ALC(Auto Level Control) ELC(Electronic Level Control) Camera ID White Balance DNR DIS Etc.