
Product Manual
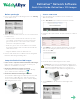

RetinaVue
TM
Network Software
Quick Start Guide–RetinaVue
TM
100 Imager
Before you begin
1. Power on the RetinaVue 100 Imager and touch Training
on the main screen.
2. Watch the tutorial and follow the on-screen instructions
to learn how to:
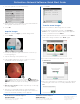
• Find the white circular reflection at the top of the
eye’s image on the LCD screen. Then position the
green circle into the center of the white circular
reflection of the patient’s pupil.
• Guide the green circle on the LCD screen towards
the patient until the white circular reflection fills the
entire field of view.
• Align the bubble inside the diamond icon.
3. Practice with interactive feedback from the integrated
RetinaVue 100 Imager training video.
Setup the RetinaVue 100 Imager
1. Power on the computer and the RetinaVue 100 Imager.
Make sure the computer is powered on. Enter your
Windows credentials if necessary.
2. Ensure the RetinaVue software is running.
If the RetinaVue Network application is not already
open, double-click the desktop icon .
3. Ensure the RetinaVue 100 Imager is docked.
The RetinaVue 100 Imager should be powered on and
docked in the cradle. Once the camera is properly
docked, a notification appears on the camera display
indicating that it is docked.
Start a new exam
1. Have the patient sit in a dark room for 5 minutes to
dilate their pupils.
2. Click New Exam in the RetinaVue Network software.
3. Complete all required fields. Required fields are outlined
in red.
4. Click NEXT to save the patient information. A message
appears indicating the patient has been added to the
camera. Click OK.
5. Lift the RetinaVue 100 Imager from the cradle.
Caution: Do not remove the RetinaVue Imager from
the cradle while the RetinaVue Network application is
transferring data. Data may be lost. The process
status icon appears while data is being transferred.
6. Touch Patients on the RetinaVue 100 Imager main
screen.