
User Manual Part 5
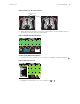
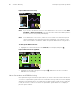


Table Of Contents

Directions for Use Standalone Monitoring 67
2. Highlight SpO
2
Monitoring (Figure 65), press to highlight Off, and press to
return to the main screen.
Figure 65. SpO
2
Monitoring Turned Off
‘SpO
2
’ has changed to ‘SpO
2
@ (time)’ (Figure 66). Spot checks are now enabled.
Figure 66. SpO
2
Monitoring Turned Off
To Ta ke a n S p O
2
Spot Check Reading
1. Enable spot checks. (See “To Prepare to Take a Spot Check Reading” on page 66.)
2. Attach the sensor to the monitor and the patient.
3. Highlight SpO
2
@ XX:XX and press . The SpO
2
drop-down menu appears
(Figure 67).
Figure 67. SpO
2
Drop-Down Menu
4. Press to highlight Spot Check.
• The drop-down menu disappears. SEARCH appears above SpO
2
Spot Check
(Figure 68) (with pulse rate if SpO
2
is the source of pulse rate).
Note
The SpO
2
drop-down menu can be accessed only when SpO
2
is set to Off.
SpO2 Monitoring
SpO2 Monitoring
Upper Alarm
Upper Alarm
Upper Limit
Upper Limit
Lower Alarm
Lower Alarm
Lower Limit
Lower Limit
HP/PR Tone
HP/PR Tone
SpO2
SpO2
Off
Off
Off
Off
Off
Off
Off
Off
On
On
On
On
On
On
Low
Low
Med
Med
High
High
100
100
90
90
Standby
Standby
Press to move the
highlight to Off.
80
80
HALL, ROBERT E.
HALL, ROBERT E.
3456187
3456187
3:11:24P
3:11:24P
Adult
Adult
Rm 239
Rm 239
NIBP mmHg
NIBP mmHg
Resp/min
Resp/min
HR/min
HR/min
SpO2 @ 3:03P
SpO2 @ 3:03P
%
S D M
SpO
2
Monitoring is Off
SpO2
SpO2
On
On
Off
Off
Spot Check
Spot Check
Enable continuous automatic SpO
2
function
Disable automatic SpO
2
function (enable Spot Checks)
Take a Spot Check reading