49 3 Standalone Monitoring Overview . . . . . . . . . . . . . . . . . . . . . . . . . . . . . . . . . . . . . . . . . . . . . . . . . . . . . . .49 Preparing for a New Patient. . . . . . . . . . . . . . . . . . . . . . . . . . . . . . . . . . . . . . . . .50 Continuing to Monitor a Patient on Power-Up . . . . . . . . . . . . . . . . . . . . . . . . . . .54 Monitoring ECG and Resp . . . . . . . . . . . . . . . . . . . . . . . . . . . . . . . . . . . . . . . . . .55 Monitoring SpO2 . . . . . . . . . . . . .
50 Standalone Monitoring Welch Allyn Propaq LT Vital Signs Monitor Preparing for a New Patient To Begin Monitoring a New Patient 1. If the monitor is on, press to turn it off. If prompted to save or delete existing data, highlight Delete and press . The monitor deletes any saved data and temporary settings, and then shuts down. 2. Press • to turn on the monitor.
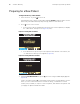
Directions for Use Standalone Monitoring 51 Figure 45. Data Display with AutoID ID: 0101819RO17Q 8:82:56 Adult Rm % HR/min Start-up AutoID SpO2 NIBP mmHg S D Resp/min M 4. In the primary data display, highlight ID: (upper left) and press . The Patient Information Entry screen appears (Figure 46): Figure 46.
52 Standalone Monitoring Welch Allyn Propaq LT Vital Signs Monitor 6. Highlight Confirm and press . \ Name alone is not sufficient to confirm a patient ID; thus, you can confirm the patient name only after you have entered the patient ID. Note 7. Verify that the patient mode (adult, pediatric, or neonate) is set correctly for this patient. Neonatal Term birth through 28 days, or up to 44 gestational weeks. Pediatric Between 29 days and 12 years. Adult 13 years and older.
Directions for Use Standalone Monitoring 53 8. Verify that the displayed time and date are correct. • The monitor displays time in either the 12-hour (AM/PM) or 24-hour format, and displays date in either the mm/dd/yy, dd.mm.yy, or yy/mm/dd format. • The date does not appear on the primary display screens. It appears on the snapshot list and on the snapshot display. a. Highlight the time display (in the upper right corner of the screen) and press The Time/Date screen appears (Figure 50). .
54 Standalone Monitoring Welch Allyn Propaq LT Vital Signs Monitor Continuing to Monitor a Patient on Power-Up If a patient’s data was saved before the monitor was last turned off (see “To Turn Off the Monitor” on page 45), you can resume monitoring that patient when the monitor is turned on again. (When patient data is saved, the monitor settings are also saved.) To resume monitoring the same patient: 1. Turn on the monitor. The “patient data stored” screen appears (Figure 52): Figure 52.
Directions for Use Standalone Monitoring 55 Monitoring ECG and Resp Overview Note In this manual, lead refers to an ECG electrode or lead wire, and Lead refers to a waveform source. You can monitor heart signs (ECG) and respiration rate (Resp) using either a 3-lead or a 5-lead ECG cable. Using a 3-lead cable, you can display one signal waveform for lead I, II, or III.
56 Standalone Monitoring Welch Allyn Propaq LT Vital Signs Monitor WARNING The monitor does not provide internal arrhythmia analysis; therefore, arrhythmias can cause the monitor to display inaccurate heart rates. WARNING Motion artifact can cause the monitor to display inaccurate heart rates. Minimize patient motion whenever possible. WARNING (1) During a surgical procedure, do not use small ECG electrodes.
Directions for Use Standalone Monitoring 57 The monitor contains type CF fully isolated patient-connected circuitry, but it is not intended for direct application on a patient’s heart. Note Severe artifact and interference (such as defibrillation interference) can cause the waveform to move off of the display for a few seconds before it is restored. Impedance pneumography (Resp) is not recommended for use with high-frequency ventilation.
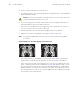
58 Standalone Monitoring Welch Allyn Propaq LT Vital Signs Monitor 4. Shave or clip the hair from the electrode sites. 5. Thoroughly clean the skin, using soap and water, isopropyl alcohol, or skin preparation pads, and lightly rub it dry. Caution To protect the patient from allergic reactions to electrodes, refer to the electrode manufacturer’s directions for use. 6. If you are using gelled electrodes, verify that the electrode expiration date has not passed and that the gel is intact and not dried out.
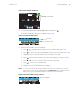
Directions for Use Standalone Monitoring 59 Figure 56. ECG Leads - Disconnected Leads Disconnected leads X X X 9. When all leads are properly connected, confirm that the monitor displays the ECG waveform, heart rate, and other patient data. Figure 57. All Vital Signs Being Displayed HALL, ROBERT E. 3456187 Adult 3:00:06P Rm 239 II 1mV/cm SpO2 2x 12 97 % 80 140/78 NIBP mmHg (102) Resp/min SpO2 HR/min @2:47P Manual To Change the Waveform Selection 1.
60 Standalone Monitoring Welch Allyn Propaq LT Vital Signs Monitor Figure 59.
Directions for Use Standalone Monitoring 61 Safety WARNING Signals differ between pacemakers. The Association for Advancement of Medical Instrumentation (AAMI) cautions that “in some devices, rate meters may continue to count the pacemaker rate during occurrences of cardiac arrest or some arrhythmias. Do not rely entirely upon rate meter alarms. All pacemaker patients should be kept under close or constant observation.
62 Standalone Monitoring Welch Allyn Propaq LT Vital Signs Monitor Improving the Waveform Display If the power source filter is off, noise from the power source can cause an unclear or noisy waveform. To Change the Power Source Filter to Reduce Noise 1. Access the Setup menu. (See “To Access the Setup Menus” on page 38.) 2. Highlight ECG. Verify that the setting for Power source filter (Figure 62) is correct for the power source in your facility.
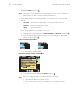
Directions for Use Standalone Monitoring Figure 63. Resp Waveform, Default Size (2x) HALL, ROBERT E. 3456187 Adult Resp 3:08:16 Rm 239 2x 80 HR/min NIBP mmHg 12 97 % Resp/min SpO2 For more detail, change the waveform size to 8x (Figure 64). (See “To Change the Waveform Size” on page 60.) Note Waveform size does not affect breath-detector sensitivity. Figure 64. Resp Waveform Enlarged for Detail (8x) HALL, ROBERT E.
64 Standalone Monitoring Welch Allyn Propaq LT Vital Signs Monitor Monitoring SpO2 Safety WARNING Accurate measurements of oxygen saturation, when derived from pulse oximetry, depend to a great extent on patient condition and proper sensor placement. Patient conditions such as shivering and smoke inhalation can result in erroneous readings.
Directions for Use Standalone Monitoring 65 WARNING Interfering substances: Carboxyhemoglobin can erroneously increase readings; the level of increase is approximately equal to the amount of carboxyhemoglobin present. Methemoglobin and other dysfunctional hemoglobins can also cause erroneous readings. Further assessment beyond pulse oximetry is recommended. Intravascular dyes, or any substances containing dyes, that change usual arterial pigmentation can cause erroneous readings.
66 Standalone Monitoring • Welch Allyn Propaq LT Vital Signs Monitor The pulse signal can disappear if any of the following conditions exists: - the sensor is too tight ambient light is too bright an NIBP cuff is inflated on the same limb as the sensor arterial occlusion occurs near the sensor the patient is in cardiac arrest or shock the patient has hypotension, severe vasoconstriction, severe anemia, or hypothermia.
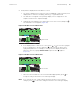
Directions for Use Standalone Monitoring 2. Highlight SpO2 Monitoring (Figure 65), press return to the main screen. to highlight Off, and press to Figure 65. SpO2 Monitoring Turned Off SpO2 SpO2 Monitoring Upper Alarm Upper Limit Lower Alarm Lower Limit HP/PR Tone Off On Standby Off On 100 Off On 90 Off Low Med High Press to move the highlight to Off. ‘SpO2’ has changed to ‘SpO2 @ (time)’ (Figure 66). Spot checks are now enabled. Figure 66. SpO2 Monitoring Turned Off HALL, ROBERT E.
68 Standalone Monitoring Welch Allyn Propaq LT Vital Signs Monitor Figure 68. SpO2 Spot Check: Waiting for an SpO2 Signal HALL, ROBERT E. 3456187 Adult 3:11:30P Rm 239 % SEARCH PR/min NIBP mmHg SEARCH indicates that the monitor is waiting for pulse oximetry data. SpO2 Spot Check Resp/min S D M • After a few seconds, the SpO2 heart-beat indicator starts showing heart beats. • After about 30 seconds, SEARCH disappears and the pulse oximetry reading appears (Figure 69). Figure 69.
Directions for Use Standalone Monitoring 69 Monitoring Blood Pressure (NIBP) Safety WARNING Always use a properly fitting cuff, placing it carefully on the patient according to the instructions presented below. Failure to fit and locate the cuff correctly can lead to inaccurate pressure readings. WARNING During monitoring, periodically observe the patient’s limb to make sure that the circulation is not impaired for a prolonged period.
70 Standalone Monitoring Note Welch Allyn Propaq LT Vital Signs Monitor For every inch the cuff is placed above the heart, add 1.9 mmHg (0.253 kPa) to the displayed NIBP reading. For every inch below the heart, subtract 1.9 mmHg (0.253 kPa). • The cuff must fit snugly without being uncomfortably tight. • The hose must be free of kinks and not pinched. 4. Align the point where the tubing connects to the cuff over the brachial or other appropriate artery.
Directions for Use Standalone Monitoring 71 • Verify that the Smartcuf filter is ON. (See “Improving NIBP Accuracy with Smartcuf” on page 71.) • Verify that the ECG leads are properly connected to the patient and monitor ECG during NIBP. (ECG monitoring is required for Smartcuf.) Note The message ???/???/(???) in an NIBP TREND display or printout indicates that the monitor could not complete an NIBP measurement during that period.
72 Standalone Monitoring Welch Allyn Propaq LT Vital Signs Monitor Taking Automatic NIBP Readings In the Auto NIBP mode, for intervals shorter than 5 minutes, the monitor immediately begins taking NIBP readings at the specified interval. For intervals of 5 minutes or longer, the readings begin when the time of day is a multiple of the interval. (If the interval is 15 minutes, for example, then the readings begin at 00, 15, 30, or 45 minutes after the hour.) To Start Automatic NIBP Readings 1.
Directions for Use Standalone Monitoring 73 Taking NIBP Readings Using the Digital Manometer To Use the Digital Manometer 1. Attach the appropriate cuff to the patient. (See Step 1 on page 69.) 2. In the NIBP control menu (see “Using Control Menus” on page 34), highlight Manometer. The manometer menu appears (Figure 71). Figure 71.
74 Standalone Monitoring Welch Allyn Propaq LT Vital Signs Monitor Figure 73.
Directions for Use Standalone Monitoring 75 To Discontinue Monitoring 1. Press . The Power Off screen appears (Figure 74 on page 75). Figure 74. Power Off HALL, ROBERT E. 3456187 Adult 15:01:24 Rm 239 You have pressed the Power Off button. There is patient data stored for Hall, Robert E. ID: 3456187 Select ( ) to delete patient data and shut down.
76 Standalone Monitoring Welch Allyn Propaq LT Vital Signs Monitor