
User Manual


Directions for Use Chapter 3 Patient monitoring 33
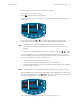
To set up an automatic NIBP measurement, do the following:
1. Attach the cuff to the patient’s arm.
2. Press to set the measurement interval.
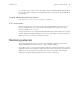
The two dashes (--) in the message window indicate that automatic measurement is
turned off.
3. To set an interval, press or to cycle through the options, which include - -, ST,
and a range of intervals: 1, 3, 4, 5, 10, 15, 30, 45, 60, 90, 120, and 240 minutes.
4. To select the currently displayed interval, press any button other than , or .
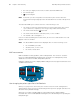
Ten seconds after you select an interval, and assuming that safe venous return
pressure (SVRP) has been maintained for at least 30 seconds, the monitor starts the
first automatic NIBP cycle and the following occurs:
• The cuff inflates to the default pressure level.
• The SYS window dynamically displays the current cuff pressure.
• If MAP is enabled, the MAP measurement value alternates with the time display
in the message window.
When the NIBP cycle ends, a tone sounds and the monitor displays the measurement
results, including pulse rate in the window. (If the SpO
2
sensor is attached to
the patient, the pulse rate is derived from the SpO
2
sensor.)
The measurement display persists until one of the following occurs:
Note
The ST interval selection works differently from the other intervals. For
information on using these settings, please refer to “STAT measurement” on
page 35.
Note
If a MAP alarm occurs, the MAP is displayed steadily in the message window.
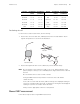
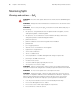
SYS
DIA
SpO
2
%
/min
mmHg
ºC
ºC
M
INTERVAL --
SYS
DIA
SpO
2
%
/min
kPa
ºC
ºC
16.2
10
.7
53
20:05:42