
User Guide


Part number 550-100-325/0718
109
AquaBalance
®
SERIES 2 WALL MOUNT GAS-FIRED WATER BOILER — Boiler Manual
35 Maintenance (continued)
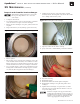
Figure 142 Inspection and removal of burner and gasket
Figure 143 Inspecting interior and cleaning the burner
3. Remove the heat exchanger cover plate and the gasket.
4. Remove the burner and burner gasket from the heat
exchanger cover plate if still in place. Do not let fragments
drop into the heat exchanger if the gasket pulls apart dur-
ing removal. Replace the gasket with a new one during
reassembly.
5. Inspect the burner gasket. Discard and use a new gasket
during re-assembly if the gasket is damaged in any way.
6. Inspect the interior of the burner. Brush and vacuum the
interior if needed to remove lint or sediment. Alternative
cleaning methods: • blow air or nitrogen from the inside
out; • clean with a water spray from inside the burner; •
swirl the burner thoroughly in a bucket of mild liquid
laundry detergent water, then rinse thoroughly. Use ONLY
a non-metallic brush.
7. Inspect the burner exterior. It must be in good condition,
with no visible damage.
8. Clean the underside of the burner flange with a soft brush
to remove any gasket fragments remaining.
9. Reinstall spring, if removed.
10. Reinstall the burner and burner gasket to heat exchanger
cover plate.
11. Reinstall heat exchanger cover plate and gasket to heat
exchanger.
12. Tighten the heat exchanger cover plate’s five (5) 10mm
nuts using a torque wrench. The nuts must be secure,
torque to 20 inch-pounds
Perform a complete start-up procedure when put-
ting the boiler back into service. See page 71 and all
instructions for start-up and verification. Include a
soap suds leak test on all interior and exterior gas
piping after starting the boiler.
Figure 144 Inspecting exterior and cleaning the burner