
Install Instructions


Annual startup (continued)
The boiler should be inspected and
started annually, at the beginning of
the heating season, only by a qualifi ed
service technician. In addition, the
maintenance and care of the boiler
designated in Figure 87, page 100 and
explained on the following pages must
be performed to assure maximum
boiler effi ciency and reliability. Failure
to service and maintain the boiler
and system could result in equipment
failure.
Electrical shock hazard — Turn off
power to the boiler before any service
operation on the boiler except as noted
otherwise in this instruction manual.
Failure to turn off electrical power
could result in electrical shock, causing
severe personal injury or death.
Address rep orted problems
1. Inspect any problems reported by owner and correct before
proceeding.
Inspect b oiler area
1. Verify that boiler area is free of any combustible materials,
gasoline and other fl ammable vapors and liquids.
2. Verify that air intake area is free of any of the contaminants
listed on page 22 of this manual. If any of these are present
in the boiler intake air vicinity, they must be removed. If
they cannot be removed, reinstall the air and vent lines per
this manual.
Inspect boiler interior & jacket door
gaskets
1. Remove jacket door and inspect interior of boiler.
2. Visually inspect the jacket door gaskets
on front of cabinet.
Make sure all are in good condition. Obtain replacements if
any gasket is damaged.
Jacket door gaskets must be intact, and must
provide a reliable seal. Replace any damaged gasket.
3. Remove the venturi air inlet silencer and clean if necessary.
Reinstall silencer.
4. Vacuum any sediment from the inside of the boiler and
components. Remove any obstructions.
Do not use solvents to clean any of the boiler
components. The components could be damaged,
resulting in unreliable or unsafe operation.
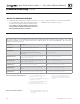
Clea n condensate trap
1. See Figure 88 .
2. Remove floor stand front access panel to access the
condensate trap, if fl oor standing.
3. Slide bracket off of condensate trap then disconnect top
nut that secures the trap body to the boiler condensate
connection (see Figure 56, page 52 ).
4. Remove the cleanout cap and remove the trap internal parts
as shown.
5. Clean all trap components.
6. Re-assemble trap assembly. Re-install all lower gaskets.
7. Make sure the trap ball moves freely when re-inserted.
8. Fill trap with fresh water by pouring into the top of the trap
body. Continue fi lling slowly until water begins fl owing
out the condensate drain line. Make sure the trap line is
unobstructed and fl ows freely.
9. Reattach the trap to the boiler condensate outlet. Push
the trap up until fully engaged. Then twist the upper nut
clockwise to tighten. Check for secure connection. Place
bracket under top nut and slide slot over rivet in cabinet,
check for secure connection.
Figure 88
Condensate trap cleaning
Trap ball
Upper nut
Cleanout cap
Valve seat, O-ring
and gasket
Condensate
drain line
Check all piping for leaks
Eliminate all system or boiler leaks. Continual fresh
make-up water will reduce boiler life. Minerals
can build up in the heat exchanger, reducing heat
transfer, overheating heat exchanger, and causing
heat exchanger failure. Leaking water may also
cause severe property damage.
1. Inspect all water and gas piping and verify to be leak free.
2. Look for signs of leaking lines in the system and in the boiler
and correct any problems found.
3. Check gas line using procedure on page 53 .
Part number 550-100-191/0917
102
®
gas-fired water boiler — 70/110/155 Boiler Manual