
Install Instructions
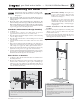
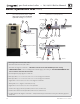
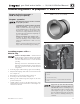
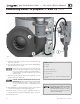
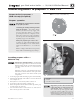
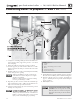
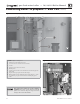

Figure 15 EVG-110 -Installing the propane gas orifi ce (some details omitted for clarity)
7. See Figure 15 , Carefully pull the gas valve down until it is free
of the venturi. Securely support the gas valve — DO NOT
leave it dangling.
8. Remove the rubber boot from the gas valve or venturi.
9. Insert the propane gas orifi ce into the rubber boot. Orifi ce
must be seated into the inner groove inside the center of the
rubber boot.
10. Install the rubber boot (item 6) guaranteeing that it is fi rmly
seated on the gas valve opening.
When re-attaching the gas valve, ensure the gas
valve rubber boot (item 6, Figure 15 ) is in place
and in good condition.
Failure to comply will cause a gas leak, resulting
in severe personal injury or death.
11. Reposition gas valve onto the venturi and reinstall the gas
valve retention bolts (item 3). Make sure the rubber boot is
fully seated on both the gas valve and venturi.
12. Swing the silencer bracket clip (item 5) back into position
and snap on to the gas line.
DO NOT ATTEMPT TO MEASURE VALVE
OUTLET PRESSURE.
The valve could be
damaged by manometer fluid contamination.
Failure to comply could result in severe personal
injury, death or substantial property damage.
13. After installation is complete, attach the propane conversion
label (in conversion kit bag) next to the boiler rating plate.
14. Perform complete start-up sequence (beginning on
page 91 ), including check for gas leaks and checking for
proper operation.
15. Reinstall jacket door.
Part number 550-100-191/0917
18
®
gas-fired water boiler — 70/110/155 Boiler Manual
Converting boiler to propane — EVG 110
(continued)
LEGEND for Figure 15
1 Gas valve
2 Venturi
3 Bolts (2) for attaching gas valve to venturi
4 Blower
5 Air silencer bracket clip
6 Propane orifi ce with boot
The jacket door must be in place during
operation.
DO NOT operate the boiler
with the jacket door removed except for
inspection and testing as directed in this
manual.