
Install Instructions


CG
i
GAS-FIRED
wATER
BOILER-
sERIEs
a-
Boiler
Manual
2b
Prepare boiler - pressure
test
Hydrostatic
pressure
test
Pressure test boiler before attaching water or gas piping
{except
as
noted below) or electrical su
pp
l
y.
Prepare
boiler
for
test
1.
Re
mov
e the shipping nipple (from CGi s
up
ply tap-
ping)
and
remove the
bo
il
er
relief valve. Temporarily
p
lu
g the reli
ef
va
l
ve
tapping with a W'
NPT
pipe
plu
g.
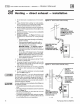
2.
Remove I \4'' nipple, reducing tee
and
drain valve
from circulator hardware a
nd
pressure/temperature
gauge carton.
Install in boiler r
eturn
co
nn
ection as
shown on page
3
and
Figure
42
, page 63. Install
circulator
on
either
the
return or su
pp
l
y.
3.
Remo
ve
1
1/a"
nip
pl
e,
l
iA"
x l
iA"
x
lh''
t
ee
and
pres
·
su
re/tempera
tur
e gauge from circulator hardware
and
pressure/temperature gauge carton. Pipe
to
boiler supply connection
as
shown
on
page 3
and
Figure
42
, page 63. (Use
pipe
dope
spar
ingly.)
4. Connect a hose
to
boiler drain
va
lve, the
other
end
connected
to
a fresh water supply. Make
sure
hose
can also be used
to
drain boiler after test.
5.
Connect a nipple
and
shutoff valve
to
system supply
connection on
th
e 1
14''
tee. This val
ve
will be used
to bleed air
durin
g
th
e fill (Val
ve
and
nipple are
not
included with boiler.)
6.
Connect a nipple
and
shutoff valve
to
system re-
turn
connection
(a
t circul
ator
flange
if
circ
ulat
or
installed on r
eturn).
This
va
l
ve
will be used
to
bleed
air during
th
e
fill
. (Val
ve
and
nipple are not included
with boiler.)
Fill
and
pressure
test
1.
Open
th
e shutoff valves you installed on supply
and
return
co
n
nectio
n
s.
2. Sl
ow
ly open boil
er
drain
va
lve
and
fresh
wa
ter sup-
ply to
fill
boil
er
with water.
3.
When
wa
t
er
tlo"'S from sh
ut
o
ff
va
lves, close boil
er
drain valve.
4. Close s
hut
off
valves.
Part
Nu
mber 550-142-780/0712
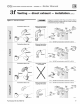
5.
Slowly r
eo
p
en
boiler
drain
valve tmtil test pressure
on
the pressure/temperature gauge reaches
no
more
than:
45
psig for boilers with
30
psig relief valv
e.
75 psig for boilers with 50 psig relief valv
e.
6.
Te
st for
no
more than
10
minutes at:
45
psig for boilers with
30
psig relief valv
e.
75 psig for boilers with 50 psig relief valv
e.
I&
WARNING
I
Do
not
leave boiler
un
attended.
A
co
ld water fill
co
uld expa
nd
and
cause
excess
i
ve
pressure,
resulting
in
severe
perso
n
al
inj
ur
y,
death
or
substantial property damage.
7. Make sure
co
n
stant
gauge pressure has been main-
tained
throughout
test. Check for leaks. Repair
if
found.
I&
WARNING
!
Leaks must be repaired at once.
Failure
to
do
so can damage boiler,
resul
ting
in
substant
ial pr
operty
dan1age.
Do
not use petroleum-based clean-
ing
or
sealing
co
m
pounds
in
boiler
system.
Severe
damage
to b
oi
l
er
will occur, resulting in substantial
property damage.
Drain
and
remove
fittings
1. DiscOJmect
fi
ll water hose from water
so
ur
ce.
2. Drain boiler at
drain
va
l
ve
or
o
ut
hose, whichever
erovides best access
to
drain. Remove hose after
dra
ining if used
to
drain boiler.
3. Remove nipples
and
valves unless they will remain
for
use
in
the
system piping.
4. Remove plug from relief valve tapping. See page
20
to
replace relief
va
lve.
13