
Manual


19
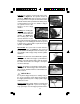
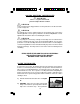
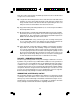
3) Open the cylinder gate. See Figure 31.
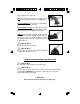
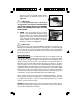
4) Press the base pin release and withdraw the base
pin. See Figure 32.
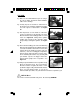
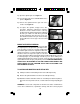
5) Remove the cylinder from the gate side of the
revolver. See Figure 33.
6) To replace the cylinder, simply reverse this
procedure. Rotate the cylinder in a clockwise
direction to insure that the hand is correctly
positioned on the cylinder ratchet before replacing
the base pin. Make sure that when you install
the base pin that the base pin release pops out.
This will insure that the base pin has been fully
inserted when the release pops out to its locked
position.
MANUFACTURER’S WARNING:
This firearm was manufactured to properly perform with
the original parts as designed. It is your duty to make
sure any parts you buy are correctly installed and
that neither replacements nor originals are altered or
changed. Your gun is a complex tool with many parts
that must relate correctly to other parts for safe and
accurate operation. Putting a gun together wrong or with modified parts can result
in a damaged gun, or personal injury or death to you or others. Always let a
qualified gunsmith work on your gun or at least, check any work not performed by
a gunsmith. Firearm safety is your primary concern. THE GUN OWNER MUST
ACCEPT FULL RESPONSIBILITY FOR THE CORRECT REASSEMBLY AND
FUNCTIONING OF THE FIREARM AFTER ANY DISASSEMBLY OR
REPLACEMENT OF PARTS.
TO CLEAN AND MAINTAIN YOUR REVOLVER:
A) Follow procedures for unloading revolver as described previously.
B) Remove the cylinder from the revolver as described previously.
C) Materials needed to clean this revolver are: a cleaning rod, cotton bore patches,
brass bore brush, powder solvent, a small soft brush and good quality gun
oil.
WARNING: Lead or lead compounds are known to the State of California to
cause cancer, birth defects, reproductive toxicity, and other serious physical
Figure 31
Figure 32
Figure 33