
Manual
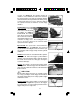
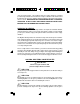


3) Grasp the revolver (if right-handed) so that the
thumb and forefinger of your left hand are firmly
holding the frame, forward of the trigger guard.
Thus, your left hand is in full control of the revolver.
See Figure 29.
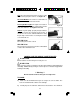
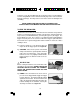
4) Place your right thumb firmly on the hammer spur.
With your thumb securely in control of the
hammer, squeeze the trigger only enough to
permit the hammer to break free of the trigger.
At that instant, slowly permit the hammer (STILL
SECURE UNDER YOUR THUMB) to move
forward to its resting position against the frame.
See Figure 30.
Practice this important gun handling skill with an unloaded revolver until you have
developed the proper control and touch to safely decock your revolver. The key to
safe decocking is having the weight of the revolver controlled with one hand, while
the thumb and forefinger of the “shooting hand” control the hammer and trigger.
CYLINDER REMOVAL OR REPLACEMENT:
W A R N I N G !
Never attempt to remove or replace a loaded cylinder.
1) Following the previous instructions to unload the
revolver.
2) Follow the previous instructions to move the
hammer to the 2nd notch.
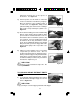
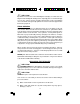
3) Open the cylinder gate. See Figure 31.
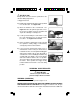
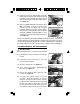
4) Press the base pin release and withdraw the
base pin. See Figure 32.
5) Remove the cylinder from the gate side of the
revolver. See Figure 33.
6) To replace the cylinder, simply reverse this
procedure. Rotate the cylinder in a clockwise
direction to insure that the hand is correctly
positioned on the cylinder ratchet before replacing
the base pin. Make sure that when you install
the base pin that the base pin release pops out.
This will insure that the base pin has been fully
18
Figure 29
Figure 30
Figure 31
Figure 32
Figure 33