
Manual
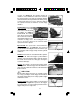
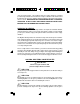


and barrel should be free of oil or grease or
obstructions. See Figure 19.
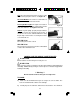
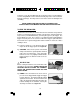
3) After inspection, use two hands to control the
revolver so that it does not fall from your grasp.
Move the hammer to the loading position or
second notch. See Figure 20. Swing out the
cylinder loading gate and insert the cartridges
while progressively revolving the cylinder. See
Figure 21.
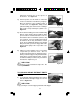
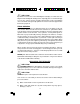
4) One method of loading your revolver and finishing
with an empty chamber lined up with the firing
pin is to load one chamber but not the next one,
then load the other four chambers (load one, skip
one, load four). Close the loading gate and pull
the hammer all the way back with a smooth
stroke. Then controlling the hammer very carefully
with your thumb, squeeze the trigger and let the
hammer down gently to the rest position. See
Figure 22.
5) Always keep the hammer in the rest position
except when you intend to shoot. The rest
position is when the hammer is against the frame.
In this position the trigger is fully forward and the
transfer bar is out of the firing position. If you do
not understand this procedure, ask your firearms
instruction to explain it to you.
W A R N I N G !
The revolver is now loaded and ready to fire. Be
extremely CAREFUL.
TO UNLOAD AND/OR EXTRACT EMPTY
CASES:
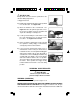
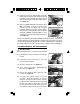
1) Use both hands during unloading so the revolver
and ammunition cartridges/empty cases do not
fall. See Figure 23a.
W A R N I N G !
Keep your fingers out of the trigger guard and off the trigger.
13
Figure 19
Figure 20
Figure 21
Figure 22
Figure 23a