
User Documentation
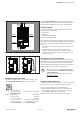

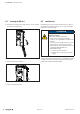
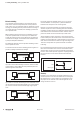

▶ Place the controller (module side to the right) on the DIN
rail so that it audibly clicks into place.
X
X1
Attaching the controller to the DIN rail
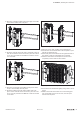
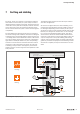
▶ Slide the controller to the left until it completely connects
with the end bracket. At the same time, press the control-
ler as close as possible to the DIN rail so that the control-
ler is not tilted.
X
X1
Sliding the controller into position
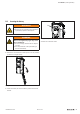
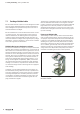
▶ Place the first module on the DIN rail and press it down
firmly. It must audibly click into place.
▶ Slide the module to the left until it audibly clicks into
place on the controller. At the same time, press the mod-
ule as close as possible to the DIN rail so that the module
is not tilted.
X
X1
Sliding the module into position
▶ Attach all of the other modules as described above.
▶ Connect the second end bracket to the end plate as spec-
ified by the alignment pins.
▶ Place both parts on the DIN rail on the right-hand side of
the station so that the end bracket faces outwards.
▶ Slide the end bracket and end plate to the left until it
completely connects with the last module.
X
X1
Sliding the end plate with end bracket into position
▶ Screw down the end bracket tightly (using a 3-mm screw-
driver).
▶ Make sure that all release levers are in the locking posi-
tion as standard. If this is not the case, click the open
release lever into place.
6 Installation | Assembling the u-control station
43Manual u-control2604080000/03/08.2020