u-create studio Quick start guide
Content 1 1.1 1.2 1.3 Introduction About this guide Weidmüller license agreement System requirements 3 3 3 3 2 2.1 Product overview Supported systems 3 3 3 3.1 3.2 3.3 3.4 3.5 3.6 3.
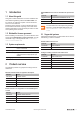
Introduction 1 Introduction PROCON-WEB Server licenses for visualisation as optional extension 1.1 About this guide This guide contains instructions on how to install the Windows based engineering software u-create studio on a PC and how to create the required u-control studio firmware on a micro SD card. Please be aware, that the u-control controller will be delivered without a firmware.
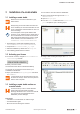
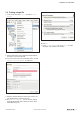
Installation of u-create studio 3 Installation of u-create studio 3.1 Installing u-create studio Please refer to the license certificate for your ticket number. You can order a micro SD card from Weidmüller. ►►Start u-create studio with right-click at Run as administrator. ►►Open a New project. ►►From the General folder select the Default Project… template or open a working project.
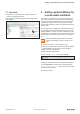
Installation of u-create studio 3.4 Creating a target file 1. In the menue bar, click Project and select Create Target. ►►Click OK. 4. In the Create Target form, click Create to create the target. This will take a few minutes. 2. Select a description for the target file and the destination path on your micro SD card. ►►If your micro SD card is not a bootable device, choose Prepare Service Medium to create one. 3. Enter the network settings for the X1 port of the u-control (default address: 192.168.101.
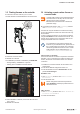
Installation of u-create studio 3.5 Flashing firmware on the controller ►►Insert the micro SD card into your u-control. The SD card slot is located behind the connector frame. 3.6 Activating u-create runtime license on u-control studio u-create studio runtime can be used license-free as a trial version for 30 days. At the end of this period a license code is required. Be aware that a runtime license is needed for productive usage. 1.
Adding a personal SSH key for u-create studio installation 3.7 Final check ►►Connect your controller to the u-create studio and check if everything works fine. Your controller should be displayed in the configured network settings. 4 Adding a personal SSH key for u-create studio installation Some users may require the access to the operating system of the controller. The access via SSH is protected by a security certificate.
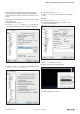
Adding a personal SSH key for u-create studio installation ►►After the admin file has been created, open the software service path. Example for Release 1.20: C:\Program Files (x86)\Weidmueller\Storage\Data\dsarmxilinxkebwm_2.1.2_arm\config\key\admin ►►Add the created file into the path shown above by replacing the old admin file. ►►Keep the default key type RSA. ►►Click Generate to generate a new key.
Adding a personal SSH key for u-create studio installation After the process of public key and private key generation is finished a new target file has to be generated and transferred to the u-control, as described in section 3.4 on page 5. The system is now prepared for a secure operation system access via PuTTY. ►►Start the PuTTY program. ►►In the Configuration, select Session and enter the IP address (default 192.168.101.100 if not changed).
Adding a personal SSH key for u-create studio installation Please note that you now have access to the controller! Weidmüller is neither liable for damage resulting from improper intervention in the control unit nor can we support you in such cases. 2729550000/00/02.