
User Documentation


Version 1.2 / August 2020 Page 71 / 102
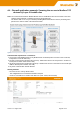
Figure 2: Empty IP forwarding table
► Click icon + to add a new line to enter IP forwarding values
► Select or fill the values as shown in the upper entry of Figure 3
→ Ensure that each input will be completed by clicking the icon .
► Now click button “Apply settings” to activate the “IP address forwarding table”
Figure 3: IP forwarding
Now the configuration of the Router is finished!
Testing the NAT masquerading feature
To test the NAT masquerading function, you must use the tool Wireshark on the PC which receives the ping
request.
1. Run Wireshark on PC (connected to WAN port) with e.g. IP address 192.168.20.100
2. Start a new live capture session to display sent and received Ethernet packets
3. Run a “ping” request from a device of Ethernet network 1 (e.g. 192.168.10.100) with destination address
192.168.20.100
4. Stop the Wireshark live capture session when the packets have been received and displayed.
Results showing in the Wireshark window:
The original sender of the ping request with IP address 192.168.10.100 is displayed as IP address
192.168.20.254 which is translated (masqueraded) by the Router.
If you disable NAT masquerading at WAN port and repeat the test, then the original sender address
192.168.10.100 will be shown.