
User Documentation


Copyright by Weidmüller Interface 18.12.2007, Seite / page 2 von 5 Technische Änderungen vorbehalten/ Technical changes reserved
Weidmüller Interface GmbH & Co KG
.
Klingenbergstr.16
.
D-32758 Detmold Tel.: +49-(0)5231-14-0 Fax: +49-(0)5231-14-2083
G
B
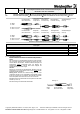
Preparations
Shake bottles with adhesive and primer firmly before use .
Adhesive:
Take-off the cover of the adhesive bottle. Before using the first
time, the tip of the bottle must be cut with a sharp knife. Pull up the
adhesive out of the bottle by using the syringe with the attached
green
needle. During this hold the bottle at an angle so that the
liquid surrounds the needle.
Primer:
Remove the cover of the primer bottle as well and pull up a small
quantity of primer (approx. 0.5 ml) into the syringe with the
provided violet
needle.
Important: After conclusion of the plug assembly, unused primer
can be filled back into the original bottle! In any case please
ensure that primer and adhesive of the syringes never
come
together and mix!
For cable assembly: Attach the bend relief sleeve and the crimp
sleeve on the cable (s. fig. 1.0).
For fibre assembly: Attach the bend relief sleeve on the fibre.
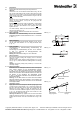
D 1.1 Kabel vorbereiten
Abb./Fig. 1.1
G
B
Kabelmantel mit Abisolierwerkzeug auf 34 mm entfernen.
Zugentlastungsgeflecht mit der Kevlarschere auf ca. 7 mm kürzen
(s. Abb. 1.1).
Cable preparation
Strip the cable jacket with the Jacket Stripping Tool by 34 mm.
Cut the strain relief members to 7 mm using the Kevlar cutter
(s. fig. 1.1).
34
~7
1-2
17 (17)
D
G
B
1.2
Faser vorbereiten
Sekundärcoating mit Abisolierwerkzeug Sekundärcoating auf
17 mm entfernen.
Primärcoating mit Abisolierwerkzeug auf max. 16 mm entfernen
(s. Abb. 1.2). Faserende mit Reinigungsstäbchen oder
Reinigungstuch reinigen.
Wichtig: Überstand Primärcoating von 1-2mm beachten!
Fibre preparation
Strip the secondary coating with stripping tool for secondary
coating to 17 mm.
Strip the primary coating with the coating stripping tool to 16 mm
max. (s. fig. 1.2). Clean the fibre with Cleaning tissues or Cleaning
swabs.
Attention: The primary coating must protrude by 1..2 mm from the
secondary coating!
Abb./Fig. 1.2
17
1-2
D
G
B
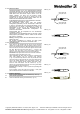
1.3
Stecker vorbereiten
Zellstofftuch auf dem Arbeitsplatz ausbreiten. Mit der Dosierspritze
einen Tropfen Aktivator auf die Steckerstirnfläche dosieren
(s. Abb. 1.3) und diese anschließend auf dem Tuch abtupfen.
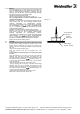
Rückwärtige Seite des Steckers auf die Kanüle der Kleberspritze
stecken und mit leichtem Druck Klebstoff dosieren, bis dieser aus
der Bohrung an der Stirnfläche des Steckerstiftes austritt
(s. Abb. 1.4). Der Kleber sollte dabei 2/3 der Stirnfläche bedecken.
Kanüle herausziehen.
Achtung: Es darf kein Kleber am hinteren Ende des inneren
Röhrchens austreten bzw. dieses benetzen; nach Aushärten des
Klebstoffes muss das Röhrchen zusammen mit dem Steckerstift
frei beweglich bleiben.
Preparation of plug
Apply paper tissue on the workplace. With the syringe apply a drop
of primer to the tip of the ferrule (s. fig. 1.3) and then soak it with
the whip.
A
ttach the back side of plug on the syringe filled with
adhesive and press slightly to apply the adhesive into the
connector until a bead of adhesive appears on the tip of the ferrule
(s. fig. 1.4). The adhesive bead should cover at least 2/3 of the
ferrule end face. Remove the syringe.
Warning: No adhesive may appear at the end of the most inner
metal tube inside the connector nor may adhere on it, as this tube
together with the ferrule must still be movable after curing of the
epoxy.
Abb./Fig. 1.3
A
ktivator Dosierflasche
Primer Bottle
Abb./Fig. 1.4
Kleberaustritt
Epoxy appears
Dosierspritze
Syringe
∅ 1,27 mm