
User Documentation

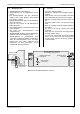

Abisolier- und Crimpautomat / Stripping and crimping machine CA 4/8 Indent universal
B-W20911-001.doc / Okt-13
21
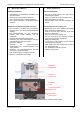
6.16 Kalibrierung / Offset
(Benutzerrichtlinie Einrichter)
• Produktionsmenü.
• Kalibrierprogramm Nummer 51 laden.
• zurück: Hauptmenü erscheint.
• Einrichten- Menü.
• Motorverstellung.
• Crimp prüfen = 1 setzen. (Motor fährt auf
Position).
• Position Crimpen = siehe Datensicherung
Kalibrierprogramm Nummer 51.
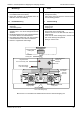
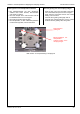
• Frontplatte öffnen.
• Die roten Knöpfe nach unten drücken und die
Kontakthaltebacken nach vorne kippen.
• Kontakt aus dem Crimpwerkzeug entfernen.
• Kontakthaltebacken zuschwenken.
• Frontplatte schließen und wieder öffnen.
• Die roten Knöpfe nach unten drücken und die
Kontakthaltebacken nach vorne kippen.
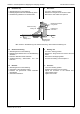
• Mit dem Prüfstift die Crimpposition testen.
• Kontakthaltebacken zuschwenken.
• Frontplatte schließen.
• Wenn nötig Abstand der Crimpstempel
korrigieren. Mit ↑↓ Abstand der Crimpstempel,
einstellen. Neue Einstellung erneut mit Prüfstift
kontrollieren.
• Offset speichern. (3 sec. drücken)
• Crimp prüfen = 0 setzen.
• Zurück ins Produktionsmenü.
6.16 Calibration / Offset
(user policy setter)
• Production menu.
• Load calibration program number 51
• back: main menu is displayed.
• Setup menu.
• Motor adjustment.
• Set crimp check = 1. (drive moves on position).
•
Crimp position = see backup calibration
program number 51.
• Open the front panel.
• Push down the red k
nobs and swing the contact
holders to the front.
• Take out the contact from the crimping tool.
• Swing the contact holding unit back.
• Close the front panel and open it again.
• Push down the red k
nobs and swing the contact
holders to the front.
• Test the crimp position with the "go/no-
go"
gauge.
• Swing the contact holding unit back.
• Close the front panel.
• If necessary correct the crimping position: With
↑↓ set the distance of the crimping tools. Test
the new setting with the "go/no-go" gauge
again.
• Save offset. (press 3 sec.)
• Set crimp check = 0
• Back to production menu.
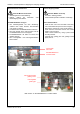
6.17 Messer prüfen (Sonderfunktion)
(optional) bei Verwendung von Formmessern
(Benutzerrichtlinie Einrichter)
• Das zu verwendende Formmesser einbauen.
• Programm auswählen mit dem gearbeitet wird.
• Abisolierwert auf 1,5 einstellen.
• Produktionsmenü
• zurück: Hauptmenü erscheint.
• Einrichten- Menü
• Motorverstellung
• Messer prüfen = 1 setzen. (Messer fahren auf
Position) anwählen.
• Mit den ↑↓ Tasten in 5/100mm Schritten die
Messerposition verringern bis die Messer
geschlossen sind.
• Motorposition speichern. (3 sek. drücken)
• Messer prüfen = 0 setzen.
• Zurück ins Produktionsmenü.
6.17 Check blades ( Special function)
(optional use form blades)
(user policy setter)
• Install the new form blades.
• Choose the program for work.
• Set the stripping value up to 1.5.
• Production menu.
• back: main menu is displayed.
• Setup menu.
• Motor adjustment.
• Set blade check = 1. (blades move on position).
• With ↑↓ buttons reduce in 5/100mm steps the
blade position until the blades are closed.
• Save motor position. (press 3 sec.)
• Set blade check = 0
• Back to production menu.