
User's Manual


7
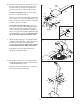
6. Pull the Seat Knob (45, not shown) out as far as
it will go, and slide the Seat Carriage (12) onto
the Bench Rail (5). Engage the Seat Knob into
the third hole from the end of the Bench Rail.
See the inset drawing. Attach a Hook (104) to
the bottom of the Bench Rail (5).
Press the two Rail Inner Caps (99), with the wide
ends on the top or bottom (as indicated), into the
ends of the Bench Rail (5). Attach the Caps with
four M4 x 16mm Screws (62).
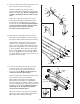
Locate the Leg Lever Cable (32), which has
three ends connected in the middle with a brack-
et. Route the end of the Cable with the eyebolt
under a “V”-pulley (92). Attach the “V”-pulley to
the Front Leg (6) with an M10 x 107mm Bolt (97)
and an M10 Nylon Locknut (76).
Slide the other
two ends of the Cable onto the Hook (104).
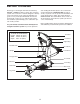
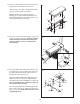
8. Attach the Lat Tower (4) to the Upright (3) with
four M10 x 25mm Button Head Screws (87) and
four M10 Split Washers (103).
Attach the Name Plate (89) to the Lat Tower (4)
with two M4 x 16mm Screws (62).
6
4
3
89
62
62
87
87
103
103
106
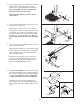
7. Attach the Bench Rail (5) to the Upright (3) with
an M10 x 132mm Bolt (66), a 19mm Spacer (17),
a 22mm Spacer (106), and an M10 Nylon
Locknut (76).
Do not over tighten the Locknut;
the Bench Rail must be able to pivot easily.
Fully tighten the Storage Knob (30) into the
Upright (3) and Bench Rail (5).
7
8
5
76
17
66
3
30
Third
Hole
99
Wide
End
Eyebolt
Wide
End
62
45
62
62
62
99
104
12
97
92
76
32
6
5
5