
User's Manual

11
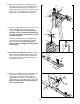
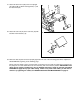
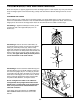
16. Route the High Cable (23) up through the Top
Frame (55), around the 115mm Pulley (74), and
back down through the Top Frame. Attach the
Pulley inside the Top Frame with an M10 x 75mm
Bolt (76), two 17.5mm Spacers (77), two M10
Washers (9), and an M10 Nylon Locknut (21).
16
23
74
76
77
77
21
55
9
9
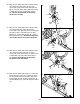
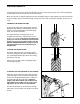
17. Attach the High Cable (23) to the “U”-bracket (57)
with an M8 Washer (70) and an M8 Nylon
Locknut (3). Note: Do not completely tighten
the Nylon Locknut; it should be threaded only
two turns onto the end of the Cable, as shown
in the inset drawing.
Attach the “U”-bracket (57) to the Weight Tube
(63) with an M8 x 45mm Bolt (66) and an M8
Nylon Locknut (3). Do not overtighten the
Nylon Locknut; the Weight Tube must be able
to pivot easily.
17
23
23
66
63
57
70
3
3
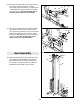
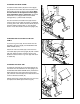
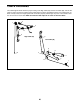
19. Wrap the Low Cable (69) around a 90mm Pulley
(15). Attach the Pulley and a pair of Pulley
Covers (40) to the bottom hole in the Front
Upright (42) with an M10 x 110mm Bolt (64), an
M10 Washer (9), and an M10 Nylon Locknut (21).
Be sure the large tabs on the Pulley Covers
are on the side shown.
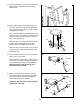
18. Locate the Low Cable (69), which has a ball on
each end. Rest the Cable in the bracket on the
Base (4). Attach a 90mm Pulley (15) inside the
bracket with an M10 x 45mm Bolt (88) and an
M10 Nylon Locknut (21).
18
19
21
69
15
4
88
21
69
15
64
40
Large
Tab
40
42
9