
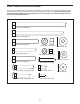
User's Manual


9
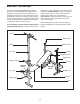
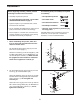
11. Orient the Left Fly Arm (25) so that the short side
of the pivot tube is on the side shown. Tap two
30mm Square Inner Caps (22) into the ends of the
Fly Arm. Press a 25mm Round Inner Cap (24) into
the weight tube on the Fly
Arm. Slide a Weight
Stop (28) onto the weight tube.
Tap a Fly Arm Stop (15) onto the welded tube on
the indicated Upright (1). Press two Plastic
Bushings (14) into the indicated holes in the
Upright. Attach the Left Fly Arm (25) to the
Upright with an M10 x 130mm Bolt (19) and a
Butterfly Knob (13).
Make sure that the lower
end of the Fly Arm is on the outside of the Fly
Arm Stop.
Repeat this step with the Right Fly Arm (not
shown) and the other Upright.
13. Route the eyelet end of the Cable (39) under the
indicated bar and over the Pulley (44). Attach the
Pulley and a pair of Pulley Covers (43) inside of
the Lat Tower (40) with an M10 x 55mm Bolt (42)
and an M10 Nylon Locknut (33). Make sure the
small tabs on the Pulley Covers are in the
indicated location.
Press a 25mm Round Inner Cap (24) into each
end of the weight tube on the W
eight Carriage
(48). Press Square Bushings (47) onto the top
and bottom of the Weight Carriage. Slide two
W
eight Stops (28) onto the weight tube.
Insert the M8 x 16mm Bolt (45) into the bracket
on the W
eight Carriage (48) from the direction
shown. Slide the Weight Carriage onto the Lat
Tower (40). Attach the Cable (39) to the Bolt in
the Weight Carriage with an M8 Nylon Locknut
(17).
Do not overtighten the Locknut; the
Cable must be able to pivot freely.
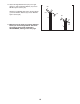
12. Press two 19mm Round Inner Caps (9) into the
ends of a Short Pad Tube (12). Insert the Short
Pad Tube into the indicated hole in the Left Fly
Arm (25) from the side shown. Slide a Short
Foam Pad (27) onto the Short Pad Tube.
Repeat this step for the Right Fly Arm (not
shown).
13
14
25
14
15
19
1
13
27
9
9
12
25
39
Bar
Small
Tab
33
42
40
39
17
24
28
28
24
48
47
Bracket
47
45
44
43
43
28
24
22
22
Weight Tube
12
1
1
Short
Side of
Pivot
Tube