
User's Manual


11
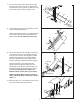
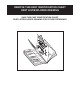
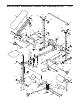
ATTACHING THE CURL POST
For some exercises, the Curl Post (38) must be
attached to the weight bench. Remove the 30mm
Square Inner Cap (22) and insert the Curl Post (38)
into the Front Leg (8). Slide the Short Adjustment
Knob (42) through the Front Leg and the Curl Post,
and turn it clockwise until it is tight.
Make sure that
you fully tighten the Adjustment Knob.
Note: When the Curl Post (38) is not in use, store
it away from the weight bench. Insert the 30mm
Square Inner Cap (22) halfway into the top of the
Front Leg (8).
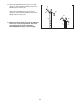
STORING THE WEIGHT BENCH
To store your weight bench, remove the Long
Adjustment Knob (31) from the bracket on the
Crossbar (3). Lift the Front Leg (8) as far as it will go.
Reinsert the Adjustment Knob into the lower set of
holes in the bracket on the Crossbar, and tighten the
Knob into the welded nut on the bracket. The
Adjustment Knob will prevent the bench from unfold-
ing.
37
38
22
8
42
31
3
Welded
Nut
8
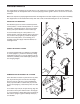
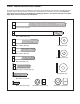
ATTACHING WEIGHTS
To use the Leg Lever (4), slide the desired weights
onto the weight tube on the Leg Lever. Secure the
weights with a W
eight Clip (48).
Do not place more
than 23 kg (50 lbs.) on the Leg Lever
.
See the inset drawing. T
o use the Fly
Arms (25),
make sure there is a W
eight Stop (28) on each weight
tube. Next, slide the desired amount of weight onto
the weight tubes. Secure the weights with a Weight
Clip (48).
Do not place more than 14 kg (30 lbs.)
on each Fly
Arm.
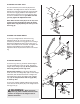
T
o use some weights, Weight Adapters (45) will need
to be slid onto the Fly
Arms (25) or the weight tube on
the Leg Lever (4).
4
28
45
48
25
Weight
Tube
W
eight
45
48
W
eight
Tube
Weight
WARNING:
When using the
Leg Lever (4), place a barbell with the same
amount of weight on the weight rests to
balance the bench.