
User's Manual
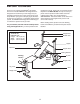
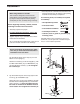
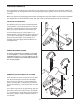

REMOVING AND ATTACHING THE FLY ARMS
Some exercises are easier to perform if the Fly
Arms
(25, 46 [not shown]) are removed from the weight
bench. To remove a Fly Arm, remove the Butterfly
Knob (13) and the M10 x 130mm Bolt (19) from the
Fly
Arm and Upright (1). Place the Fly
Arms in a safe
place.
To re-attach a Fly Arm (25, 46 [not shown]), align the
pivot tube in the Fly Arm with the hole in the Upright
(1). Insert the M10 x 130mm Bolt (19) through the Fly
Arm and the Upright. Tighten a Butterfly Knob (13)
onto the Bolt.
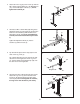
ADJUSTING THE BACKREST
The Backrest (6) can be used in a declined position,
a level position, or two inclined positions. To use the
Backrest in a declined position, remove the Support
Rod (7) and lay the Backrest on the Crossbar (3).
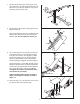
To use the Backrest (6) in a level position or an
inclined position, insert the Support Rod (7) through a
set of holes in the Uprights (1). Rotate the Support
Rod to the locked position, so the locking pin is
wrapped around the Upright. Rest the Backrest on
the Support Rod.
1
1
7
19
13
3
6
Locking
Pin
25
1
9
ADJUSTMENTS
The weight bench is designed to be used with your own weight set (not included). The steps below explain how
the weight bench can be adjusted. Refer to the accompanying exercise guide to see the correct form for several
exercises.
Make sure all parts are properly tightened each time the weight bench is used. Replace any worn parts immediately.
The weight bench can be cleaned with a damp cloth and a mild, non-abrasive detergent. Do not use solvents.
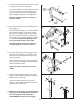
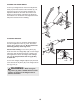
USING THE BARBELL HOOKS
To change weights whilst your barbell (not included)
is on the Uprights (1), secure the barbell by rotating
the Barbell Hooks (40, 41) over the barbell. This will
reduce the possibility of the barbell tipping whilst you
are changing weights.
40
1
1
41