Model No. WEEVBE0726.0 Serial No. Write the serial number in the space above for future reference. USER’S MANUAL Serial Number Decal QUESTIONS? As a manufacturer, we are committed to providing complete customer satisfaction. If you have questions, or if there are missing or damaged parts, please call: 08457 089 009 Or write: ICON Health & Fitness, Ltd. Unit 4 Revie Road Industrial Estate Revie Road Beeston Leeds LS11 8JG UK csuk@iconeurope.
TABLE OF CONTENTS IMPORTANT PRECAUTIONS . . . . . . . . . . . . . . . . . . . . . . . . . . . . . . . . . . . . . . . . . . . . . . . . . . . . . . . . . . . . . . . .3 BEFORE YOU BEGIN . . . . . . . . . . . . . . . . . . . . . . . . . . . . . . . . . . . . . . . . . . . . . . . . . . . . . . . . . . . . . . . . . . . . . .4 PART IDENTIFICATION CHART . . . . . . . . . . . . . . . . . . . . . . . . . . . . . . . . . . . . . . . . . . . . . . . . . . . . . . . . . . . . . .5 ASSEMBLY . . . . . . . . . . . .
IMPORTANT PRECAUTIONS WARNING: To reduce the risk of serious injury, read the following important precautions before using the weight bench. 1. Read all instructions in this manual and all warnings on the weight bench before using the weight bench. Use the weight bench only as described in this manual. including a barbell and weights, on the weight rests. Do not place more than 32 kg (70 lbs.) on the leg lever. Note: The weight bench does not include a barbell or weights. 2.
BEFORE YOU BEGIN Thank you for selecting the WEIDER® 215 weight bench. The versatile WEIDER 215 weight bench is designed to be used with your own weight set (not included) to develop the major muscle groups of the body. Whether your goal is a shapely figure, dramatic muscle size and strength, or a healthier cardiovascular system, the WEIDER 215 weight bench will help you to achieve the specific results you want. reading this manual, please call the telephone number on the front cover of this manual.
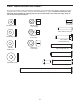
PART IDENTIFICATION CHART This chart is provided to help you identify the small parts used in assembly. The number in parentheses below each part refers to the key number of the part from the PART LIST on page 14. Important: Some parts may have been pre-assembled for shipping purposes. If you cannot find a part in the parts bags, check to see if it has been pre-assembled.
ASSEMBLY • Place all parts in a cleared area and remove the packing materials. Do not dispose of the packing materials until assembly is completed. Make Assembly Easier This manual is designed to ensure that the weight bench can be assembled successfully by anyone. Most people find that by setting aside plenty of time, assembly will go smoothly.
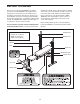
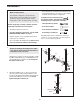
3. Attach the Front Leg (8) to the Frame (2) with two M8 x 43mm Carriage Bolts (29), two M8 Washers (12), and two M8 Nylon Locknuts (13). Do not tighten the Nylon Locknuts yet. 3 2 29 12 13 8 4. Apply some of the included grease to an M10 x 55mm Bolt (30). Attach the Frame (2) to the upper set of holes in the bracket on the Crossbar (3) with the Bolt and an M10 Nylon Locknut (25). Do not overtighten the Nylon Locknut; the Frame must pivot easily.
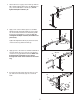
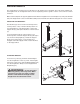
7. Attach the two Backrest Tubes (5) to the Backrest (6) with four M6 x 38mm Screws (22) and four M6 Washers (20). Do not tighten the Screws yet. 7 6 20 5 20 8. Insert the Support Rod (7) through a set of holes in the Uprights (1). Make sure that the locking pin is on the side shown. Rotate the Support Rod to the locked position, with the locking pin wrapped around the left Upright. 22 22 8 1 Apply grease to an M10 x 137mm Bolt (28).
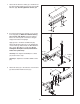
10. Attach the Right Barbell Hook (32) to the right Upright (1) with an M8 Zinc Washer (35) and an M8 Zinc Nylon Locknut (36). Do not overtighten the Nylon Locknut; the Barbell Hook must pivot easily. 10 Attach the Left Barbell Hook (33) to the left Upright (1) with an M8 Zinc Washer (35) and an M8 Zinc Nylon Locknut (36). Do not overtighten the Nylon Locknut; the Barbell Hook must pivot freely. 36 35 32 1 33 35 1 11. Make sure that all parts are properly tightened before you use the weight bench.
ADJUSTMENTS The weight bench is designed to be used with your own weight set (not included). The steps below explain how the weight bench can be adjusted. Refer to the accompanying exercise guide to see the correct form for several exercises. Make sure that all parts are properly tightened each time the weight bench is used. Replace any worn parts immediately. The weight bench can be cleaned with a damp cloth and a mild, non-abrasive detergent. Do not use solvents.
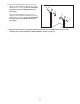
USING THE BARBELL HOOKS To change weights while your barbell is on the Uprights (1), secure the barbell by rotating the Barbell Hooks (32, 33) over the barbell. This will reduce the possibility of the barbell tipping while you are changing weights. 32 1 33 1 STORING THE WEIGHT BENCH Before storing the weight bench, remove any weights from the Leg Lever (4). To store the weight bench, first remove the Adjustment Knob (23) from the indicated bracket. Next, lift the Front Leg (8) as far as it will go.
EXERCISE GUIDELINES THE FOUR BASIC TYPES OF WORKOUTS Muscle Building To increase the size and strength of your muscles, push them close to their maximum capacity. Your muscles will continually adapt and grow as you progressively increase the intensity of your exercise. You can adjust the intensity level of an individual exercise in two ways: • by changing the amount of weight used • by changing the number of repetitions or sets performed.
slowly as you stretch and do not bounce. Ease into each stretch gradually and go only as far as you can without strain. Stretching at the end of each workout is an effective way to increase flexibility. Rest for a short period of time after each set. The ideal resting periods are: • Rest for three minutes after each set for a muscle building workout. • Rest for one minute after each set for a toning workout. • Rest for 30 seconds after each set for a weight loss workout.
PART LIST—Model No. WEEVBE0726.0 Key No. 1 2 3 4 5 6 7 8 9 10 11 12 13 14 15 16 17 18 19 20 21 22 Qty. 2 1 1 1 2 1 1 1 2 2 1 6 8 4 1 4 4 4 1 4 4 4 Description Upright Frame Crossbar Leg Lever Backrest Tube Backrest Support Rod Front Leg 22mm Round Inner Cap Pad Tube Seat M8 Washer M8 Nylon Locknut M8 x 53mm Bolt 25mm Round Angled Cap 38mm Square Inner Cap 30mm x 1.5mm Square Inner Cap Foam Pad 25mm Round Inner Cap M6 Washer M6 x 16mm Screw M6 x 38mm Screw Key No.
EXPLODED DRAWING—Model No. WEEVBE0726.
ORDERING REPLACEMENT PARTS If you encounter any problems with this product, or if you need to order replacement parts, contact the ICON Health & Fitness, Ltd. office, or write: ICON Health & Fitness, Ltd.