
User`s manual


18
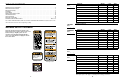
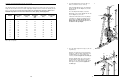
WEIGHT
Top
1
2
3
4
5
6
7
8
9
HIGH PULLEY
(lbs.)
13
31
47
64
77
87
106
128
138
154
PRESS ARM
(lbs.)
25
44
67
81
101
118
135
158
183
197
BUTTERFLY
ARM
(lbs.)
18
33
52
62
76
86
98
114
125
139
LEG LEVER
(lbs.)
13
26
40
53
65
75
91
106
117
134
LOW PULLEY
(lbs.)
15
34
48
64
78
90
103
120
137
153
WEIGHT RESISTANCE CHART
The chart below shows the approximate weight resistance at each exercise station. “Top” refers to the 6 lb. top
weight. The other numbers refer to the 12.5 lb. weight plates. Weight resistance shown for the butterfly arm sta-
tion is for each butterfly arm. Note: The actual resistance at each station may vary due to differences in
individual weight plates as well as friction between the cables, pulleys, and weight guides.
7
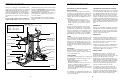
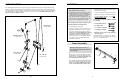
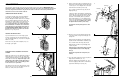
4. Insert two Weight Guides (5) into the Base (1).
Make sure that the holes are on the top.
Slide two Weight Bumpers (44) onto the Weight
Guides (5). Slide the nine Weights (16) onto the
Weight Guides.
Press the Weight Tube Bumper (17) into the
Weight Tube (18). Insert the Weight Tube into the
stack of Weights (16) as shown.
Lubricate the indicated holes in the Top Weight
(19) with grease. Slide the Top Weight onto the
Weight Guides (5). Make sure the pin on the
Weight Tube (18) rests in the pin grooves on
the bottom of the Top Weight.
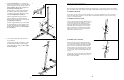
5. Press two 50mm Square Inner Caps (31) into the
Top Frame (6).
Attach the Top Frame (6) to the Front and Rear
Uprights (4, 3) with four M10 x 68mm Bolts (87),
four M10 Washers (71), and four M10 nylon
Locknuts (72). Do not tighten the Locknuts yet.
Attach the Weight Guides (5) to the Top Frame
(6) with an M10 x 153mm Bolt (91), two M10
Washers (71), two 18mm Spacers (109), and an
M10 Nylon Locknut (72). Do not tighten the
Locknuts yet.
5
4
5
19
Pin
Pin
Groove
Lubricate
Holes
18
17
16
44
1
31
4
3
5
71
71
91
72
72
72
72
72
109
109
87
71
87
71
31
6
Note: 1 kg = 2,2 pounds.