Model No. 831.15963.0 Serial No. Write the serial number in the space above for reference. Serial Number Decal (under frame) • Assembly • Operation • Maintenance • Part List and Drawing Sears, Roebuck and Co. Hoffman Estates, IL 60179 CAUTION Read all precautions and instructions in this manual before using this equipment. Keep this manual for future reference. Downloaded from www.Manualslib.
TABLE OF CONTENTS WARNING DECAL PLACEMENT . . . . . . . . . . . . . . . . . . . . . . . . . . . . . . . . . . . . . . . . . . . . . . . . . . . . . . . . . . . . . . .2 IMPORTANT PRECAUTIONS. . . . . . . . . . . . . . . . . . . . . . . . . . . . . . . . . . . . . . . . . . . . . . . . . . . . . . . . . . . . . . . . . . 3 BEFORE YOU BEGIN. . . . . . . . . . . . . . . . . . . . . . . . . . . . . . . . . . . . . . . . . . . . . . . . . . . . . . . . . . . . . . . . . . . . . . . .4 PART IDENTIFICATION CHART.
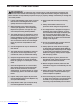
IMPORTANT PRECAUTIONS WARNING: To reduce the risk of serious injury, read all important precautions and instructions in this manual and all warnings on the weight bench before using the weight bench. Sears assumes no responsibility for personal injury or property damage sustained by or through the use of this product. 1. It is the responsibility of the owner to ensure that all users of the weight bench are adequately informed of all precautions. 10. Keep hands and feet away from moving parts. 11.
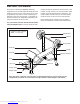
BEFORE YOU BEGIN Thank you for selecting the WEIDER® PRO 265 weight bench. The versatile PRO 265 weight bench is designed to develop every major muscle group of the body. Whether your goal is to have a shapely figure, dramatic muscle size and strength, or a healthier cardiovascular system, the weight bench will help you to achieve the specific results you want. reading this manual, please see the back cover of this manual.
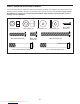
PART IDENTIFICATION CHART Use the drawings below to identify the small parts needed for assembly. The number in parentheses below each drawing is the key number of the part, from the PART LIST near the end of this manual. Note: If a part is not in the hardware kit, check to see if it has been preassembled. Extra hardware may be included. If a part is missing, call 1-877-992-5999.
ASSEMBLY • Assembly requires two persons. • To identify small parts, see page 5. • Because of its weight and size, assemble the weight bench in the location where it will be used. Make sure that there is enough clearance to walk around the weight bench as you assemble it. • In addition to the included tool(s), assembly requires the following tools: one adjustable wrench one Phillips screwdriver • Place all parts in a cleared area and remove the packing materials.
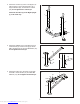
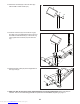
3. Attach the Crossbar (3) to the Left Upright (14) with two M10 x 77mm Carriage Bolts (18), a Support Bracket (22), and two M10 Locknuts (33); do not tighten the Locknuts yet. 3 Attach the Crossbar (3) to the Right Upright (1) in the same way. 1 14 22 3 33 18 4. Attach the Stabilizer (13) to the top of the indicated bracket (A) on the Front Leg (8) with an M8 x 15mm Screw (37) and an M8 Washer (16); do not tighten the Screw yet. 4 13 13 8 8 16 37 A 5.
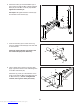
6. Attach the Frame (2) and the Stabilizer (13) to the Crossbar (3) with two M10 x 60mm Carriage Bolts (34) and two M10 Locknuts (33); do not tighten the Locknuts yet. 6 See steps 3–6. Tighten the M10 Locknuts (33) and the M8 x 15mm Screws (37). 33 2 3 13 34 7. Insert a Pad Tube (10) into a hole in the Leg Lever (4). Slide a Foam Pad (23) onto each side of the Pad Tube. 7 4 10 Attach the other Pad Tube (not shown) and two Foam Pads (23) in the same way. 23 23 23 8.
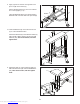
. Apply a generous amount of the grease to the pivot rod (B) on the Frame (2) 9 Set the Backrest Support (7) into a set of brackets on the Uprights (1, 14). 5 Grease Orient the Backrest Tubes (5) as shown. Slide a Backrest Tube onto each side of the pivot rod (B). 7 1 14 2 B 10. Orient the Backrest (6) so that the narrow end (C) is in the indicated location.
12. Attach the Curl Pad (24) to the Curl Post (27) with two M8 x 15mm Screws (37). 12 24 27 37 13. Insert the Curl Post (27) into the Front Leg (8) and align one of the adjustment holes in the Curl Post with the indicated hole (D) in the Front Leg. Then, tighten the Curl Knob (31) into the Front Leg. 13 27 8 31 D 14. Attach a Spring Collar (25) to the weight tube on the Leg Lever (4). 14 25 4 15. Make sure that all parts are properly tightened before you use the weight bench.
ADJUSTMENT The steps below explain how the weight bench can be adjusted. See the accompanying exercise guide to see the correct form for several exercises. Make sure that all parts are properly tightened each time you use the weight bench. Replace any worn parts immediately. The weight bench can be cleaned with a damp cloth and a mild, non-abrasive detergent; do not use solvents. ADJUSTING THE BACKREST The Backrest (6) can be used in any of three positions.
ATTACHING WEIGHTS TO THE BARBELL 36 Slide the same amount of Weight (36, 38) onto both ends of the Barbell (29). Then, slide the two Spring Collars (25) against the Weights. 29 38 WARNING: Always secure Weights (36, 38) on the Barbell (29) with the Spring Collars (25). Do not place more than 110 lbs. (49 kg), including the Barbell and Weights, on the weight rests. 36 25 ATTACHING THE CURL PAD 24 For some exercises, the Curl Pad (24) must be attached to the weight bench.
EXERCISE GUIDELINES FOUR TYPES OF STRENGTH WORKOUTS workout, and the numbers of repetitions and sets to complete. Progress at your own pace and be sensitive to your body’s signals. Follow each workout with at least one day of rest. Note: A “repetition” is one complete cycle of an exercise, such as one sit-up. A “set” is a series of repetitions. Warming Up—Start with 5 to 10 minutes of stretching and light exercise.
PART LIST Key No. Qty. 1 2 3 4 5 6 7 8 9 10 11 12 13 14 15 16 17 18 19 20 21 1 1 1 1 2 1 1 1 8 2 1 2 1 1 2 4 1 4 2 1 3 Model No. 831.15963.0 R1016A Description Key No. Qty.
EXPLODED DRAWING Model No. 831.15963.0 R1016A 6 12 24 1 11 7 12 5 37 37 31 25 23 9 26 37 30 21 26 18 3 30 13 16 9 16 35 37 25 33 30 19 32 8 28 26 35 4 23 21 18 26 17 22 33 16 16 20 21 2 37 5 30 22 27 14 26 15 34 36 38 29 10 38 9 23 9 36 25 15 Downloaded from www.Manualslib.
90 DAY FULL WARRANTY If this Sears Weight Bench Exerciser fails due to a defect in material or workmanship within 90 days of the date of purchase, call 1-800-4-MY-HOME® (1-800-469-4663) to arrange for free repair (or replacement if repair proves impossible). This warranty does not apply when the Weight Bench Exerciser is used commercially or for rental purposes. This warranty gives you specific legal rights, and you may also have other rights which vary from state to state. Sears, Roebuck and Co.