
User Guide


Webroot Enterprise System Administrator Guide 25
To install distributor servers:
1. Execute the WebrootDistributorSetup.exe file on the server you want to be a distributor
server.
• The file is typically in the C:\Program Files\Webroot\Enterprise\Server\Distributor
folder of the system where you installed Webroot Enterprise Server.
2. Follow the on-screen instructions.
• You can now assign distributor servers.
Assigning Distributor Servers
After you install the distributor server on your servers, you must assign those servers to groups.
You can assign a distributor server to one or more groups or to the whole company. For example, if
you set up four distributor servers and assign them all to the whole company, the system randomly
selects the order of distributors it sends back to the client workstations.
For a complete description of the how the update process works, see “How Webroot Enterprise
Updates Work” on page 7.
This process spreads the load across the servers to ensure that the servers are not overwhelmed
with update requests. Distributor servers also can control bandwidth use over a WAN by localizing
the client definition and update downloads.
To assign a distributor server:
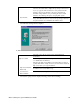
1. Select Start > Programs > Webroot (Enterprise) > Admin Console.
• The Admin Console window displays, showing the Webroot Enterprise Dashboard
panel.
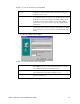
2. Select Admin Tasks > Assign Distributors.
• The Assign Distributors panel displays, with a list of all existing groups on the left
side.
3. Click Add New Distributor.
• The Add Distributor window displays.
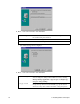
4. Enter a name for the distributor server.
• If you enter the DNS name of a server on your network, the IP address automatically
populates when you tab to the second field.
5. If necessary, enter the IP address of the server.
6. Click OK.
• The server name now displays in the list on the right side of the panel.