THE STINGRAY & XOCET OWNER’S MANUAL SERIES 2 MODELS READ THIS MANUAL BEFORE USING YOUR NEW AIRGUN THE FAMOUS NAME IN AIRGUNS WEBLEY & SCOTT LIMITED Frankley Industrial Park, Tay Road, Rubery, Rednal, Birmingham, B45 0PA, England. Telephone: 0121 453 1864. Fax: 0121 457 7846.
Guarantee The Webley Stingray and Xocet are fully guaranteed against faulty workmanship and defective materials for a period of three years from the original date of purchase provided it has not being misused or tampered with in any way. Should you experience problems with your rifle please consult the dealer from whom it was purchased. This guarantee does not affect your statutory rights. THE LAW KNOW THE LAW ON AIRGUNS AND OBEY IT.
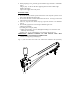
USE, CARE AND MAINTENANCE OF THE WEBLEY STINGRAY & XOCET AIR RIFLES. SPECIFICATION. The Stingray and Xocet are spring operated, single shot, break-action air rifles fitted with precision rifled barrels, primarily suited to waisted lead pellets. The use of steel darts is not recommended. The rifles are available in .177 (4.5 mm) and .22 (5.5 mm) calibre’s. The rifles share many special design features, which include: 1. An adjustable 2 stage trigger mechanism. 2.
Stingray and Xocet rifles are supplied fully assembled, packed in specially designed protective boxes, and are ready for immediate use once familiarization with the rifle and an appreciation of the basic safety rules has been completed. THE BASIC SAFETY RULES ARE: 1. Treat every rifle as if it is loaded. 2. Never point a rifle at anyone, or allow anyone to point a rifle at you, even if you know it is not loaded. 3. Always carry a rifle so the direction of the muzzle is under control, even if you stumble. 4.
3. When preparing to fire, point the gun towards the target and take a comfortable stance. Stingray only - If the safe has been applied, push it forward with the right thumb to disengage. Squeeze the trigger when ready to fire ROUTINE CARE. 1. Do not fire the rifle without a pellet in the barrel. The only time you have to do this is when adjusting the trigger pull. 2. Do not leave the rifle cocked or loaded when not in use. Leaving it cocked will reduce the life of the mainspring. 3.
f) Sear and trigger fulcrum pins (2412 & 2100) - very occasionally when stock is removed. Fig. 3 TRIGGER ADJUSTMENT. There are two means of adjustment to the trigger pull. The first adjustment alters the length of the first stage and is achieved by turning the screw running through the trigger blade (3417). Turning the screw clockwise makes the first stage travel shorter (fig. 4). Fig.
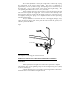
The second adjustment is to the pull weight and is achieved by varying the compression of the trigger spring (2289). The range of adjustment is approximately 3 to 5 lb. (1.36 to 2.27 kg). The adjusting screw is located on top of the body tube, (fig. 5) and is flush at the lowest pull weight setting. The corresponding movement of the screw is 1/4´´ (6.35 mm). Using a suitable Allen key, turn clockwise to increase the trigger pull and anti-clockwise to lighten the trigger pull.
XOCET The foresight assembly is secured by a 2 B.A. socket set screw (2852). Take note that the screw lies at an angle of 30° from the perpendicular when inserting the key. Use a suitable Allen key; the correct tightening torque is 2lbs.ft (0.28 kg m). As a guide to the correct tightening torque, the key will spring through an angle of about 10° to 15°.
PARTS LIST FOR THE SERIES 2 WEBLEY STINGRAY AND SERIES 2 WEBLEY XOCET AIR RIFLES. REFER TO THE PARTS DIAGRAM OVERLEAF. PART DESCRIPTION No. No. PART OFF No. DESCRIPTION No.
WEBLEY STINGRAY AND XOCET – OLD MODELS Old model Webley Stingrays and Xocets are fitted with loading levers made from pressings and are not fitted with a cocking key. Series 2 rifles are fitted with a solid loading lever, part no. 3503. The following older parts cannot be replaced by Series 2 components. Please ensure you order the correct part for your particular model rifle. PART DESCRIPTION No. No. OFF 1267 LOADING LEVER STOP PIN 1 2366 LOADING LEVER 1 3396 .
XOCET When required, the rearsight can be removed or replaced as a complete sub assembly To remove, completely unscrew the vertical adjusting nut (2850), then unscrew the 4m.m slotted screw (2851). The vertical adjusting stud (2854) is bonded to the barrel housing and should not be removed. ADJUSTING THE OPEN REARSIGHT (ZEROING). Although the Stingray and Xocet are fitted with different types of open sights the method of zeroing the rifles is exactly the same.
Fig.7. MAJOR OVERHAUL OR REPAIR. (For a qualified repairer) Changing the Mainspring and Damper The need to change the mainspring will become necessary only after the rifle has been fired many thousands of times. The need to change will become indicated by a gradual loss of pellet velocity not attributable to any other cause, e.g. air leaks, mechanical damage, etc. Removing the old mainspring First ensure that the rifle is not cocked, then dismantle in the following sequence1.
2. Remove the circlip (1279) from the trigger fulcrum pin (2412), then remove the fulcrum pin and take out trigger assembly (3428). Pull out trigger adjusting spring (2289) located in the underside of the body end plug (3338). 3. Hold the gun upright with the body end plug resting on a table or workbench, press firmly down against the residual spring pressure (this will be about 80lbs. (35kg) on a new gun), then tap out the body end plug pin (2365).
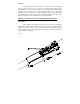
Fig. 8 To dismantle the loading lever from the barrel assembly, tap out the loading lever fulcrum pin (1266). To dismantle the barrel lock mechanism, tap out the barrel locking plunger pin (2869) using a 1/8´´ (3 mm) diameter drift (fig. 9). Fig.
Compress the barrel locking plunger spring (2990) by pushing the barrel locking plunger (2989) and withdraw the drift. Ease the pressure off the barrel locking plunger allowing the plunger to rise against the spring pressure. The barrel locking plunger, together with the barrel locking plunger spring can now be withdrawn from the barrel housing. When reassembling the lock mechanism it is advisable to hold the barrel housing in a vice, using soft clamps or cloth to protect its finish.
Fig.10 Oil the piston assembly, then wipe the front faces of the seal and piston dry. Clean and lightly lubricate the body tube bore - do not over lubricate. Refit the piston assembly to the body tube assembly, ensuring their loading lever slots are aligned with one another. Important Note. The lip of the piston seal is an interference fit in the body tube.
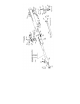
Stingray Rearsight Should it become necessary to dismantle the blade assembly which provides windage adjustment first remove the circlip (2675), then unscrew the windage screw (2643) until the windage screw detent plunger (2670) becomes visible.Further unscrewing will allow the plunger and its spring (2671) to escape take care to catch them as they emerge. Do not forget to replace the rearsight leaf elevating spring (1599) when refitting the rearsight assembly to the action.
ENSURE AT THIS STAGE THAT THE BODY END PLUG, ETC. IS FITTED BEFORE PROCEEDING WITH REFITTING THE TRIGGER ASSEMBLY Insert the trigger adjusting spring into its pocket in the underside of the body end plug, then place the trigger in position and fit the remaining fulcrum pin, aligning first the safe then the trigger. Having inserted the pin right through, fit its circlip. Check that the action functions satisfactorily before re-assembly into the stock. Xocet Sear/ Trigger Mechanism.