SUMMIT 450 & 650 TM LP Gas Barbecues Operating Guide Read before assembly W EB ER ER EB EB ER W ER W EB W DANGER If you smell gas: 1 Shut off gas to the appliance. 2 Extinguish any open flames. 3 Open lid 4 If odour continues, keep away from the appliance and immediately call your gas supplier or your fire service. Leaking gas may cause a fire or explosion which can cause serious bodily injury or death, or damage to property.
DANGER Failure to follow the Dangers, Warnings and Cautions contained in this Owner’s Manual may result in serious bodily injury or death, or in a fire or an explosion causing damage to property. WARNINGS Do not store a spare or disconnected liquid propane cylinder under or near this barbecue. Improper assembly may be dangerous. Please carefully follow the assembly instructions in this manual.
TABLE OF CONTENTS Warnings 2 Warranty 4 A Word of Thanks 4 General Instructions 5 Operating Area Storage Steam-N-Chips Smoker Refilling The Liquid Propane Cylinder Important LP Cylinder Information Connect Then Filled Liquid Propane Cylinder Safe Handling Tips For Liquid Propane Gas Cylinders 5 5 *REFER TO YOUR STEP-BY-STEP SECTION AT THIS TIME Lighting Crossover Ignition System To Extinguish General Maintenance Spider/Insect Screens Inspection and Cleaning of the Spider/Insect Screens Main Burn
WARRANTY Weber-Stephen Products Co. (Weber) hereby warrants to the ORIGINAL PURCHASER of this Weber Gas Grill that it will be free of defects in material and workmanship from the date of purchase as follows: Aluminum Castings, lifetime, 1 year paint Cooking Grates, 7 years no rust through Flavorizer Bars, 7 year no rust through All Remaining Parts, 5 years, when assembled and operated in accordance with the printed instructions accompanying it. Weber may require reasonable proof of your date of purchase.
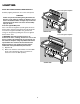
GENERAL INSTRUCTIONS Your Weber Gas Barbecue is a portable outdoor cooking appliance. With the Weber Gas Barbecue you can grill, barbecue, roast and bake with results that are difficult to duplicate with indoor kitchen appliances. The closed lid and Flavorizer® Bars produce that “outdoor” flavor in the food. The Weber Gas Barbecue is portable so you can easily change its location in your yard or on your patio. Portability means you can take your Weber Gas Barbecue with, if you move.
LIGHTING EACH HEAT ZONE OPERATES INDEPENDENTLY Crossover Ignition System 1 Summary lighting instructions are on the control panel. DANGER Failure to open the lid while igniting the barbecue’s burners, or not waiting 5 minutes to allow the gas to clear if the barbecue does not light, may result in an explosive flare-up which can cause serious bodily injury or death.
3) Turn the cylinder on by turning the cylinder valve anticlockwise. 1) Open the lid. 2) Make sure all burner control knobs are turned OFF. (Push each burner control knob down and turn clockwise.) WARNING: Do not lean over the open barbecue. Keep your face and body at least one foot away from the matchlight hole when lighting the barbecue. WARNING: The storage space under the cooking module is intended for storage of nonflammable items only. 4) Select Heat Zone.
3) Turn the tank on by turning the tank valve counterclockwise. 9) Observe if LEFT burner has ignited by looking through matchlight hole. 4) Select heat zone. WARNING: If LEFT burner fails to ignite turn LEFT burner control knob to OFF and wait 5 minutes before attempting to ignite again. 5) Put a match in the match holder and strike the match. 6) Insert match holder and lit match through matchlight hole to ignite LEFT burner. 10) After the LEFT burner is lit you can turn on the RIGHT burner.
COOKING CLEANING WARNING: Turn your Weber Gas Barbecue OFF and wait for it to cool before cleaning. WARNING: Do not move the Weber Gas Barbecue when operating or hot. CAUTION: Do not clean your Flavorizer® Bars or cooking grates in a self-cleaning oven. For availability of replacement cooking grates and Flavorizer Bars contact the Customer Service Representative in your region using the contact information sheet provided with your manual.
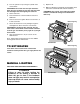
USING THE STEAM-N-CHIPS SMOKER The Steam-N-Chips Smoker cooks with both Weber FireSpice Wood Chips and Chunks. For best results with faster cooking foods like steaks, burgers and chops, etc., we recommend using the FireSpice Chips because they ignite and create smoke faster. For longer cooking foods such as roasts, chicken and turkeys, etc., we recommend using FireSpice Chunks because they ignite slowly and provide smoke for a longer period of time.
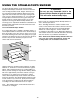
The LP cylinder supplied with your barbecue is equipped with an OPD (Overfilling Prevention Device) and a QCC1 or Type 1 (CGA810) cylinder connection. The cylinder connection is compatible with the barbecue connection. REFILLING THE LIQUID PROPANE CYLINDER We recommend that you refill the LP cylinder before it is completely empty. This is a secondary device to prevent the overfilling of your LP cylinder.
Hook the liquid propane cylinder onto the fuel gauge. Loosen the cylinder lock wing nut. Swing the cylinder lock down. Tighten the wing nut. Remove plastic dust cover from the fuel cylinder valve. Screw the regulator coupling onto the cylinder valve(1), clockwise, or to the right. Hand tighten only. Note: This is a new type of connection. It tightens clockwise and will not allow gas to flow unless the connection is tight. The connection requires tightening by hand only.
Liquid Propane Cylinder requirements • Replacement LP cylinders supplied by Weber satisfy the above requirements. Check to be sure other cylinders have a D.O.T. certification(1), and date tested(2) is within five years. Your LP gas supplier can do this for you. If you have questions about spare LP cylinders The burner tube air shutter is fitted with a stainless steel screen(1) to prevent spiders and other insects access to the burner tubes through the air shutter openings.
GENERAL MAINTENANCE Replacing Main Burners Main Burner Flame Pattern 1. 2. 3. 4. Your Weber Gas Barbecue must be OFF and cool. Turn OFF gas at source. Disconnect regulator. To remove control panel refer to “Remove the control panel and the front panel” in the Step-By-Step Guide. 5. Remove cooking grates. 6. Remove Flavorizer bars. 7. Remove the manifold by unsnapping the clips at the right and left front of the cooking box.
GENERAL MAINTENANCE 10. Slide the burner assembly from each Heat Zone. The left and right burners are connected by the Crossover tube. 9. Pull the manifold(1) out of the burners.
GENERAL MAINTENANCE 11. Lift and twist the burner assembly slightly to separate the crossover tube(1) from the burners. Remove the burners from the cooking box. Crossover® Ignition System Operations If the Crossover Ignition System fails to ignite the Left burner, light the Left burner with a match. If the Left burner lights with a match, then check the Crossover Ignition System. • Check that both the white(1) and black(2) ignition wires are attached properly. Separate here (1) 12.
TROUBLESHOOTING Problem Cure Check Burners burn with a yellow or orange flame, Inspect Spider/Insect Screens for in conjunction with the smell of gas. possible obstructions. (Blockage of holes.) Clean Spider/Insect Screens and inspect burners. (See Maintenance Section.) Burner does not light, or flame is low in HIGH position. Is LP fuel low or empty? Refill LP tank. Is fuel hose bent or kinked? Straighten fuel hose.
PATENTS & TRADEMARKS © 2000 Weber-Stephen Products Co. Weber, the silhouette, Flavorizer and Crossover are registered U.S. trademarks; Summit, Grill Cozy, Gas Catcher, Spider Stopper, and Steam-N-Chips, are trademarks, all of Weber-Stephen Products Co., 200 East Daniels Road, Palatine, IL 60067-6266. U.S.A. ® Summit Series Gas Barbecues are covered by U.S. Patent Nos. 4,677,964; 4,727,853; 4,777,927; 4,829,978; 4,860,724; 4,941,817; and 4,966,125; and, Canada patent Nos. 1,283,586 and 1,300,995.