
User Manual


Table Of Contents
- DANGER
- WARNINGS
- WARRANTY
- LP Tank
- PATENTS AND TRADEMARKS
- Contents
- FEATURES
- General Instructions
- For Installation in Canada
- Storage
- Operating area
- Assembly
- Tools needed
- Supplies needed
- Check package contents
- Assemble wheels
- Assemble frame
- Continue frame assembly
- Complete frame assembly
- Insert casters
- Add cooking box
- Install manifold bracket
- Install tank panel assembly
- Add fuel scale assembly
- Install igniter
- Set LP fuel scale
- Fill LP tank
- Check that the burner valves are off
- Connect LP tank
- Check for gas leaks
- Install Flavorizer Bars and Cooking Grates
- Install the bottom tray
- Install the lid
- Install tool holders, control panel and burner control knobs
- Install swing table
- Complete accessory installation
- OPERATING INSTRUCTIONS
- Lighting
- Crossover Ignition System
- To Extinguish
- Manual Lighting
- To Extinguish
- Cooking
- Storage and/or Nonuse
- Periodic Cleaning
- Refilling the LP tank
- Removal of the LP tank
- Connecting the filled LP tank
- LP Tank
- Safe handling tips for LP Gas
- Liquid Propane (LP) Tank(s)
- Annual Maintenance
- Inspection and Cleaning of the Weber Spider Stopper Guards
- General Maintenance
- Weber Spider Stopper Guards
- Main Burner Flame Pattern
- Main Burner Cleaning Procedure
- Replacing Main Burners
- Crossover Ignition System Operations
- TROUBLESHOOTING
- Parts List
- A FINAL WORD OF THANKS
26
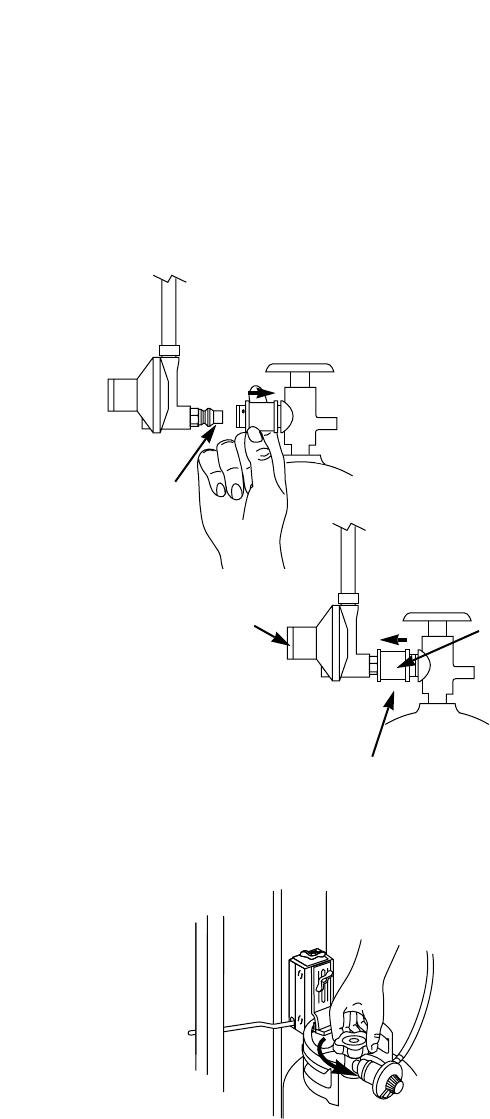
Figure 6
Male fitting
Regulator
Collar
Figure 5
(a)
(b)
c) Connect the hose to the tank. Route the hose so it
does not interfere with the scale indicator rod. Slide
back the collar of the quick disconnect on the tank
valve. Figure 5 (a). Push the male fitting of the
regulator into the quick disconnect, and maintain
pressure. Slide the collar closed. Figure 5 (b). If it does
not engage or lock, repeat procedure. Gas will not flow
unless the quick disconnect is properly engaged.
d) Mix soap and water.
e) Open the tank valve. Figure 6.
f) Check for leaks by wetting the fitting with the soap
and water solution and watching for bubbles. If
bubbles form or if a bubble grows there is a leak.
If leak does not stop, turn off the gas and contact
Weber-Stephen Customer Service. Do not use the
barbecue.
g) When leak checks are complete, turn gas supply OFF
and rinse connections with water.
LP Tank
The LP tank manufacturer is responsible for the materials,
workmanship and performance of the tank. If the tank has
a defect, malfunctions, or you have a question regarding
the tank, call the tank manufacturer's customer service
center. The phone number is on the warning decal which is
permanently attached to the tank. If the tank manufacturer
has not resolved the issue to your satisfaction, then call
Weber-Stephen Products Co., Customer Service Center.