
User`s guide

Web Mountain Technologies Page 40
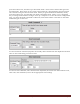
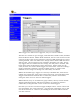
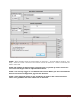
Notice that on the trigger listing, there are three buttons on the far right –
Delete, Edit, and Run.
When you click on Delete, you will delete the trigger from the list and the trigger
will no longer be available, and it will not operate.
When you click on Edit, the trigger entry screen will be shown with the
parameters as originally entered for this trigger already populated in the fields.
Edit the parameters as you desire, then click on the button labeled Save Edits.
If you click on the button labeled Run, it will “RUN’ the Send Command part of
the trigger. For example, if you have a trigger setup that would send an email, if
you click on Run, that email will be sent. Similarly, if a trigger will send out a
UPB link 26 Activate on NID 56 based upon its receive trigger, if you click Run,
the RUC will send out a UPB command for NID = 56, Link 26 Activate.
NOTE: A maximum of 40 queued up delay or scheduled triggers is possible. Any more than
this can lead to unpredictable behavior. Normally, you will not have to worry about this.
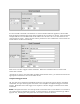
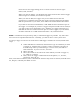
To setup a trigger to send out an email when a UPB trigger command is received, follow these
steps:
Under UPB Receive Command, determine the type of command you want
to trigger on, whether that is a link or a direct command, and select it
from the drop down by Command Type. In most cases, this will be a
Link command. If you’re not sure, use Link.
Enter your NID
Enter the Link ID or the Direct ID of the module you wish to trigger on,
i.e., Link 12 or Unit 24
Then, select the trigger command from the dropdown, i.e., Activate,
Deactivate, Goto Off, etc.
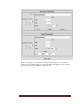
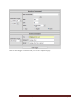
Now, under Send Command, select “Send Email” from the drop down on the left, then fill in the
TO, Subject, and Body text fields as such: