
User`s guide

Web Mountain Technologies Page 37
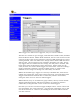
For the first example, let’s trigger one UPB command to be sent upon receipt of a different UPB
command. To setup this page to send out another UPB command when a UPB trigger
command is received, follow these steps:
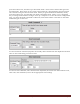
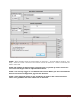
Under Receive Command, determine the type of command you want to
trigger on, whether that is a link or a direct command, and select it from
the drop down by Command Type. In most cases, this will be a Link
command. If you’re not sure, use Link.
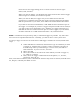
Enter your NID
Enter the Link ID or the Direct ID of the module you wish to trigger on,
i.e., Link 12 or Unit 24
Then, select the trigger command from the dropdown, i.e., Activate,
Deactivate, Goto Off, etc.
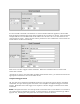
Now, under Send Command, select “Send UPB” from the drop down on
the left, then select your NID and Link ID. Then, select your command –
i.e., Activate, Deactivate, etc. – from the dropdown. Make sure you do
not enter the <ctrl-T> or <cr>.
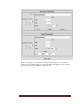
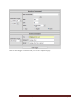
Next, if you want a delay, enter in the delay in hours (max of 17 hours),
minutes (max of 59), and seconds (max of 59). In the following example,
we put in a 15 second delay. This is a good example of the secure entry
application. The garage door opens. There is a proximity sensor
connected to a UPB IO module that causes a UPB command to be sent.
The RUC recognizes this signal, then starts a countdown timer. After 15
seconds, it sends a signal to turn off the lights that had been turned on
by the door opening.
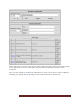
Before you click on Add Trigger, the screen will look like this: