
Installation Guide

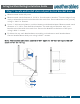
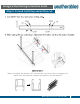
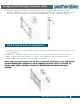
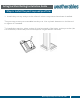
Table Of Contents
- Please note:
- Tools:
- • Hacksaw or metal cutting saw
- • Drill
- • Drill bits 5/32”
- • Screwdriver
- • Measuring tape
- • Level
- Step 1: Locate and install stair rail post & stair bracket base.
- Note: The brackets should be spaced 26 3/8” apart for 36” tall railing and 32 3/8” apart for 42” tall railing.
- Step 2: Cut and install top and bottom rail.
- 1. Cut the bottom and top rail to fit between posts if necessary.
- Step 3: Install pickets and spacers.
- 1. Snap the spacer into place and insert pickets into top and bottom rail one by one as shown below.
- IMPORTANT: DO NOT snap in last 4 spacers into place before installing the last 4 pickets. Insert the last 4 pickets as a group and adjust the distance between the pickets THEN snapping the last 4 spacers into place.
- Note: The size of spacer for each rail end is different. (A special round label will be used to identify the end spacer.) Cut the spacers to fit the rails if necessary. To ensure equal picket spacing at each post, cut first and last spacers to equal l...
- Step 4: Install the post cap and post trim.
- 1. Install the post cap and post trim after all other components have been installed.
- The post cap comes pre-assembled on the post. Use a plastic hammer or similar tool to tighten it if needed.
- To install the post trim, place a drop of glue into each of the holes on the post trim (do not overflow). Fasten the post trim and press it tight about 6 seconds.

Arlington Stair Railing Installation Guide
We’re happy to help. Call 1-855-224-9761
.
2
THE BEST CHOICE FOR STRONG & DURABLE RAILING SYSTEMS
Our exclusive manufacturing process ensures our aluminum railing will provide
superior strength plus it is virtually maintenance free. This guide will help make your
installation easy. For questions, please call 1-855-224-9761 and welcome to
Weatherables
®
.
Please note:
It is the responsibility of the installer to conform to local building codes and safety
requirements. It is also the installer’s responsibility to obtain all necessary building
permits. The purchaser and installer should review the intended use of the products
with a licensed professional engineer to determine code compliance. Weatherables
®
or
its distributors shall not be held liable for improper or unsafe installations.
These instructions are guidelines and do not cover every installation scenario. Review
all instructions before starting railing installation. The installer may need to modify the
exact installation method to meet unique site requirements.
Tools:
•
Hacksaw or metal cutting saw
•
Drill
•
Drill bits 5/32”
•
Screwdriver
•
Measuring tape
•
Level