
Instructions / Assembly

1.1
1.3
2.1
2.2
2.3
2.4
2.5
INST#: XISMWH-REV 1-15
Pre - Installation Notes
Do not cut any wires. Any extra wire length can be coiled up.
If using insulated wire staples to hold the wires in place, be
sure not to pierce or crush the wires.
During installation, it is recommended that you temporarily
cover the photocell on the transformer with dark tape so the
lights will be on when you plug them in. This will help check
for any issues during installation. Remove tape when done.
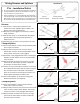
Harness
1.1 The Harness is used to extend power from the
transformer to each individual light or splitter. The
Harness has a male and female end.
1.2 Harnesses can be plugged into each other to extend
length if needed.
1.3 The Harness can be run underneath the deck (above
ground) and/or inside the post/railing where it is
hidden from view.
1.4 If needed, the connectors can fit through a 1/2” hole.
5 Output Splitter
2.1 The 5 Output Splitter is used to evenly distribute power
from 1 input to 5 outputs.
2.2 Plug the male connector from a harness into the
female input connector of the 5 Output Splitter. Press
firmly until the connection is fully engaged.
2.3 Connection is fully engaged when there is minimal gap
between the male harness connector and the female
input connector.
2.4 Plug the female connector from a harness or a light
into one of the male output connectors. Repeat for
each output connector that is needed.
2.5 If there are any unused output connectors, an end cap
(2 included) must be used to seal the output connector.
Any unused end caps can be saved or discarded. If
there are more than 2 unused output connectors, a 2
Output Splitter (see below) should be used.
2.6 The 5 Output Splitter can be secured using (2) #2
Stainless Steel Screws (not supplied).
2 Output Splitter
3.1 The 2 Output Splitter is used to evenly distribute
power from 1 input to 2 outputs.
3.2 Plug the male connector from a harness into the female
input connector of the 2 Output Splitter. Press firmly
until the connection is fully engaged. (See Step 2.3)
3.3 Plug the female connector from a harness or a light
into one of the male output connectors. Repeat for
the other output connector.
Harness
(Various Lengths)
1.2
Wiring Harness and Splitters
Components
5 Output Splitter
(2 End Caps Included)
2 Output Splitter
1/2”
3.2
3.3