
Specifications
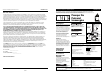


22-Sp
Manual de Instrucciones de Operación y Piezas
Guía de Diagnóstico de Averías
Problema Posible(s) Causa(s) Acción a Tomar
La bomba no
enciende o no
funciona
La bomba se inicia
y se detiene con
demasiada frecuencia
La bomba no se
apaga o el protector
térmico se dispara
La bomba funciona
pero sale muy poca
agua o nada
La bomba emite un
ruido de borboteo
al final del ciclo
1. Fusible quemado
2. Bajo voltaje
3. Motor defectuoso
4. Impulsor
1. Reflujo de agua desde la
tubería
2. La entrada de agua drena
en la superficie del sensor
1. Obstrucción en la tubería
2. Bajo voltaje
3. Demasiados
electrodomésticos sobre el
circuito eléctrico
4. Sensor de agua sucia
5. La entrada de agua drena
en la superficie del sensor
1. Impulsor atascado
2. Válvula de retención
instalada al revés
3. Aire en la bomba
1. La bomba ha aspirado aire
2. El tiempo requerido para
bombear es menos de
4 segundos
1. Si está quemado, cámbielo por un fusible del tamaño correcto
o reajuste el disyuntor
2. Si el voltaje está por debajo de 108 voltios, verifique el
tamaño del cable
3. Reemplace la bomba
4. Si el impulsor no funciona, retire la caja y quite la obstrucción
1. Instale o cambie la válvula de retención
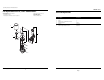
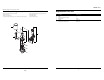
2. RPosicione la bomba LEJOS de la entrada de agua de manera
que el interruptor no quede cerca de la entrada de agua
(ver Figura 1).
1. Retire la bomba y limpie la bomba y la tubería
2. Si el voltaje está por debajo de 108 voltios, verifique el
tamaño del cable
3. Instale la bomba en un circuito dedicado.
IMPORTANTE: NO use un cordón eléctrico de extensión
para alimentar la bomba.
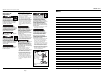
4. Limpie la superficie del sensor (ver Figura 2)
5. Posicione la bomba lejos de la entrada de agua de manera
que el interruptor no quede cerca de la entrada de agua
(ver Figura 1).
1. Limpie el impulsor
2. Invierta la posición de la válvula de retención
3. Taladre un orificio de 1/8" (3 mm) en la tubería de descarga
entre la bomba y la válvula de retención
1. Limpie la superficie del sensor (ver Figura 2).
2. El tiempo de funcionamiento adicional no daña la bomba
Maintenance
Always disconnect the electrical
supply before attempting to install,
service, relocate or perform any
maintenance. If the power source is out
of sight, lock and tag in the open (off)
position to prevent unexpected power
application. Failure to do so could
result in fatal electrical shock. Only
qualified electricians should repair this
unit. Improper repair could result in
fatal electrical shock.
1. Let the pump cool for a minimum of
two hours before servicing because
the pump contains hot oil under
pressure and the motor is hot.
2. Disassembly of the motor prior to
expiration of warranty will void the
warranty. If repairs are required,
see troubleshooting chart.
3. Inlet should be kept clean and free
of all foreign objects and inspect
annually. A clogged inlet will
damage pump.
Operation (Continued)
4. Fill sump with water. The pump will
start automatically when the water is
about 1.5” from the top of the
switch. The pump will recycle
thereafter as required.
• Sump pump will run a minimum of
4 seconds, to a maximum of 16
before stopping.
• Sump pump run time will be
determined by the sump pit size
and water flow rate into the sump
pit.
• Under flooding conditions, the
sump pump will stop for 1 second,
every 16 seconds, and
automatically turn back on.
5. Do not operate the pump unless it is
submerged in water. Dry running
causes pump failure.
6. The motor is equipped with an
automatic reset thermal protector.
7. While the pump is draining the pit,
verify that the discharge piping is
carrying the water to a point several
feet away from the foundation.
8. If pump discharge line is exposed to
freezing temperature, the exposed
line must be pitched to drain.
Trapped water will freeze and
damage the pump.
3
CDUCAP Series
4. Pump should be checked monthly
for proper operation. Pump can be
checked for proper operation by
briefly removing pump power cord
from the back of the water sensor
plug and inserting directly into the
grounded outlet. In this condition,
the pump will run continuously.
Once pump operation is verified,
replace pump power cord into the
back of the water sensor plug (see
Figure 2).
5. Wipe water sensor surface regularly
to prevent silt or other coatings
from building up on sensor face
(see Figure 2).
This pump contains dielectric oil for
cooling. This oil can be harmful to the
environment. Check the state
environmental laws before disposing
this oil.
www.waynepumps.com